REL1000 User Guide
Part 1: Setup
Part 2: Using Your Phidget
About
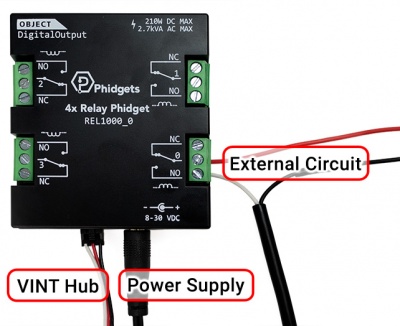
The REL1000 has mechanical relays that will let you control the power circuits of as many as four separate devices. It is suitable for both AC and DC applications. You interact with the REL1000 through the Digital Output Channel Class to switch power to your circuit or device on and off.
Explore Your Phidget Channels Using The Control Panel
You can use your Control Panel to explore your Phidget's channels.
1. Open your Control Panel, and you will find the following channels:
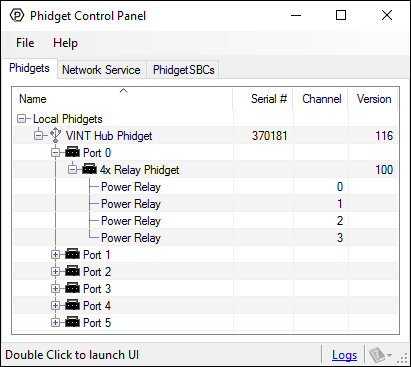
2. Double click on a channel to open an example program. Each channel belongs to the DigitalOutput channel class:
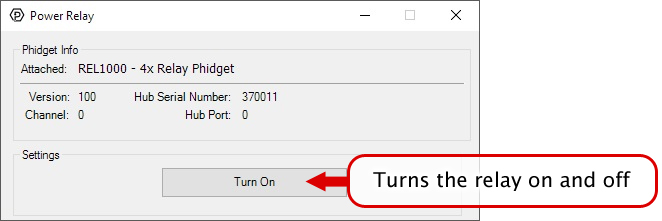
In your Control Panel, double click on "Power Relay":
Part 3: Create your Program
Part 4: Advanced Topics and Troubleshooting
Before you open a Phidget channel in your program, you can set these properties to specify which channel to open. You can find this information through the Control Panel.
1. Open the Control Panel and double-click on the red map pin icon:

2. The Addressing Information window will open. Here you will find all the information you need to address your Phidget in your program.
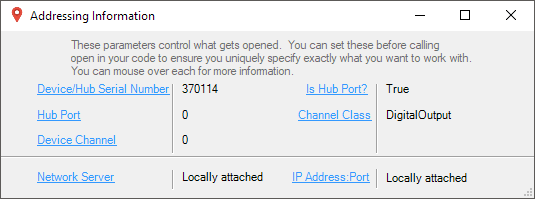
See the Phidget22 API for your language to determine exact syntax for each property.
Firmware Upgrade
MacOS users can upgrade device firmware by double-clicking the device row in the Phidget Control Panel.
Linux users can upgrade via the phidget22admin tool (see included readme for instructions).
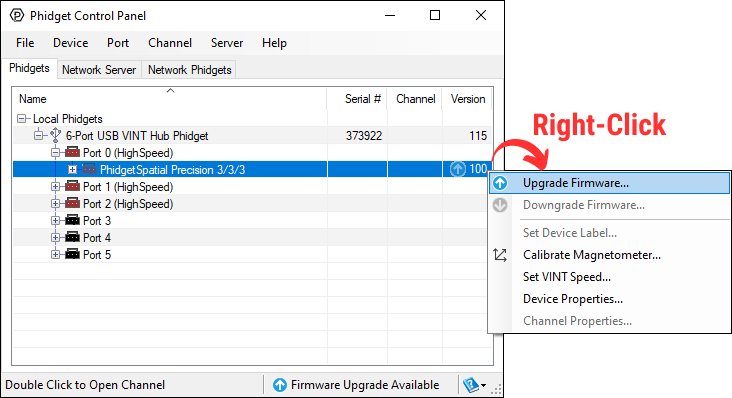
Windows users can upgrade the firmware for this device using the Phidget Control Panel as shown below.
Firmware Downgrade
Firmware upgrades include important bug fixes and performance improvements, but there are some situations where you may want to revert to an old version of the firmware (for instance, when an application you're using is compiled using an older version of phidget22 that doesn't recognize the new firmware).
MacOS and Linux users can downgrade using the phidget22admin tool in the terminal (see included readme for instructions).
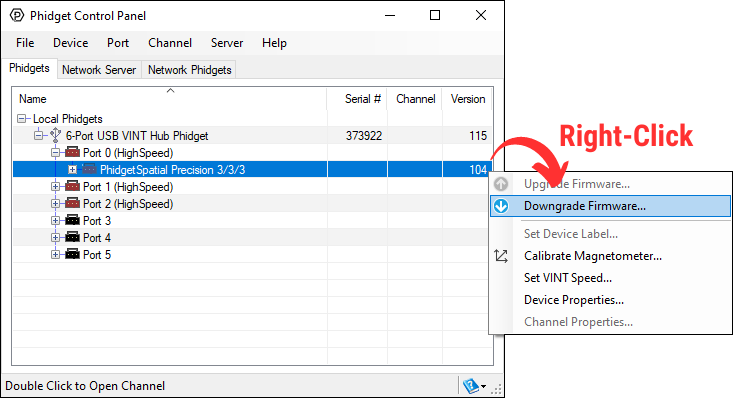
Windows users can downgrade directly from the Phidget Control Panel if they have driver version 1.9.20220112 or newer:
Firmware Version Numbering Schema
Phidgets device firmware is represented by a 3-digit number. For firmware patch notes, see the device history section on the Specifications tab on your device's product page.
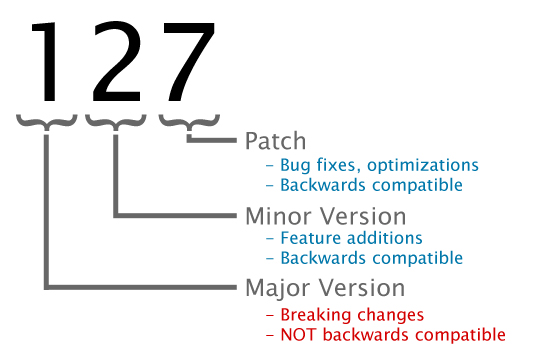
- If the digit in the 'ones' spot changes, it means there have been bug fixes or optimizations. Sometimes these changes can drastically improve the performance of the device, so you should still upgrade whenever possible. These upgrades are backwards compatible, meaning you can still use this Phidget on a computer that has Phidget22 drivers from before this firmware upgrade was released.
- If the digit in the 'tens' spot changes, it means some features were added (e.g. new API commands or events). These upgrades are also backwards compatible, in the sense that computers running old Phidget22 drivers will still be able to use the device, but they will not be able to use any of the new features this version added.
- If the digit in the 'hundreds' spot changes, it means a major change has occurred (e.g. a complete rewrite of the firmware or moving to a new architecture). These changes are not backwards compatible, so if you try to use the upgraded board on a computer with old Phidget22 drivers, it will show up as unsupported in the Control Panel and any applications build using the old libraries won't recognize it either. Sometimes, when a Phidget has a new hardware revision (e.g. 1018_2 -> 1018_3), the firmware version's hundreds digit will change because entirely new firmware was needed (usually because a change in the processor). In this case, older hardware revisions won't be able to be upgraded to the higher version number and instead continue to get bug fixes within the same major revision.
Starting from firmware version 110, using Phidget22 library versions 1.0.0.20190107 and later, this device supports the use of a failsafe feature to put your device in a safe state should your program hang or crash.
With this feature, each Digital Output channel on this device has its own independently settable failsafe timer.
If the failsafe is not enabled, the device will behave as it did before the addition of this feature, maintaining the last state or duty cycle it received until it is explicitly told to stop.
Enabling the failsafe feature for a channel starts a recurring failsafe timer. Once the failsafe timer is enabled, it must be reset within the specified time or the channel will enter a failsafe state. Resetting the failsafe timer will reload the timer with the specified failsafe time, starting when the message to reset the timer is received by the Phidget.
For example: if the failsafe is enabled with a failsafe time of 1000ms, you will have 1000ms to reset the failsafe timer. Every time the failsafe timer is reset, you will have 1000ms from that time to reset the failsafe again.
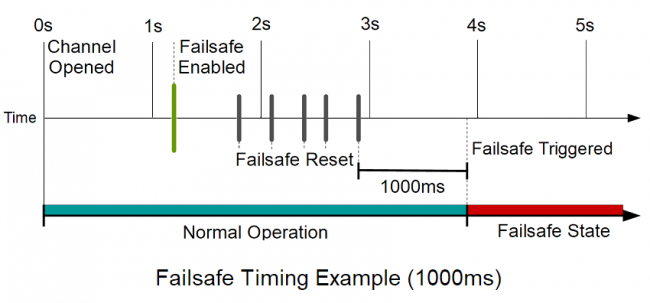
If the failsafe timer is not reset before it runs out, the channel will enter a failsafe state. For Digital Output channels, this sets the output to a FALSE state. On the REL1000 this switches the relay contact to the Normally-Closed position. Once the channel enters the failsafe state, it will reject any further input until the channel is reopened.
To prevent the channel from falsely entering the failsafe state, we recommend resetting the failsafe timer as frequently as is practical for your applicaiton. A good rule of thumb is to not let more than a third of the failsafe time pass before resetting the timer.
Once the failsafe has been enabled, it cannot be disabled by any means other than closing and reopening the channel.
When you use a failsafe in your program, we strongly recommend setting up an error event handler to catch the Failsafe Error Event, to allow your program to catch the failsafe event.
If you want your program to try to automatically recover from a failsafe state, you can close and re-open the channel from the error event handler after determining a failsafe condition caused the event.
The relays on the REL1000 are SPDT (Single pole, double throw). This means there is a common pin (C), a normally open pin (NO) and a normally closed pin (NC). When the relay is off (i.e. no power running through the relay coil), the switch will be resting in the NC position, as seen in the diagram. When the relay's Digital Output object is toggled in software, it will switch to the NO position. If the Digital Output object is closed (using the Close() method), the relay will always return to the NC position. For this reason, it is considered a best practice to call Close() at the end of your program.
If communication between the REL1000 and your computer is broken (e.g. if the Phidget cable is unplugged), the relay will not change state. You will get a detach event for the attached channels of that Phidget. It is recommended you handle this case in your Digital Output detach handler. Since communication between the relay and computer is already interrupted, you can not tell the Digital Output to return to the NC position unless you use the Failsafe feature. (See Failsafe section in this User Guide or in the Phidget22 API documentation)
