LCD1100 User Guide
Part 1: Setup
Part 2: Using Your Phidget
About
The Graphic LCD Phidget allows you to display simple images and text. The screen is 128 pixels wide and 64 pixels tall, and each pixel is 0.45 mm. The backlight brightness and pixel contrast can both be controlled from software. You can use default fonts or load your own. The frame buffer allows you to save fonts and images.
Explore Your Phidget Channels Using The Control Panel
You can use your Control Panel to explore your Phidget's channels.
1. Open your Control Panel, and you will find the following channel:
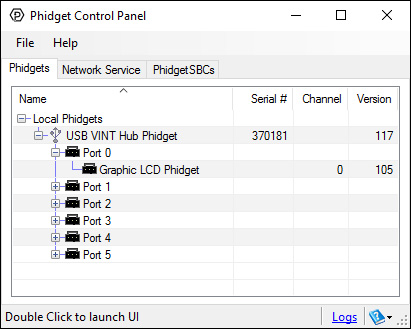
2. Double click on the channel to open the example program. This channel belongs to the LCD channel class:
In your Control Panel, double click on "Graphic LCD Phidget":

Part 3: Create your Program
Part 4: Advanced Topics and Troubleshooting
Before you open a Phidget channel in your program, you can set these properties to specify which channel to open. You can find this information through the Control Panel.
1. Open the Control Panel and double-click on the red map pin icon:

2. The Addressing Information window will open. Here you will find all the information you need to address your Phidget in your program.
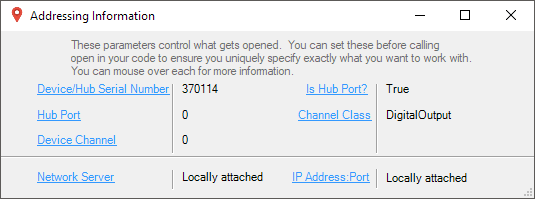
See the Phidget22 API for your language to determine exact syntax for each property.
Firmware Upgrade
MacOS users can upgrade device firmware by double-clicking the device row in the Phidget Control Panel.
Linux users can upgrade via the phidget22admin tool (see included readme for instructions).
Windows users can upgrade the firmware for this device using the Phidget Control Panel as shown below.
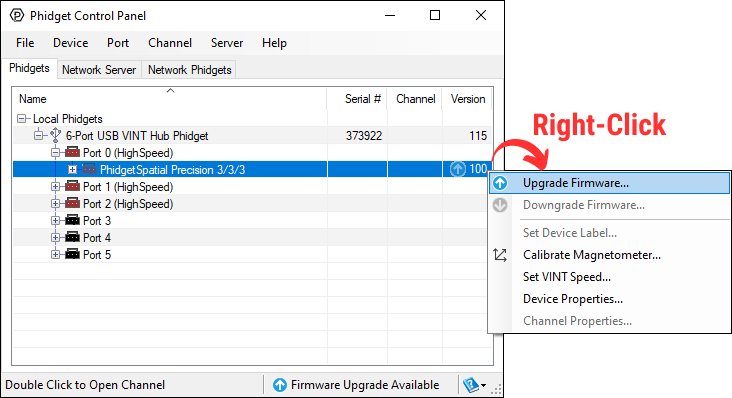
Firmware Downgrade
Firmware upgrades include important bug fixes and performance improvements, but there are some situations where you may want to revert to an old version of the firmware (for instance, when an application you're using is compiled using an older version of phidget22 that doesn't recognize the new firmware).
MacOS and Linux users can downgrade using the phidget22admin tool in the terminal (see included readme for instructions).
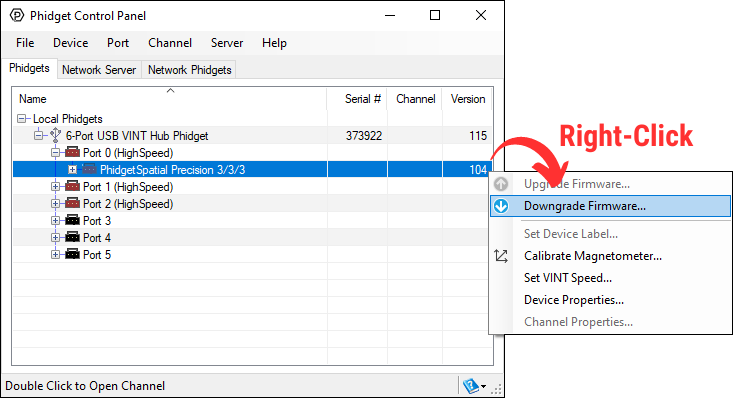
Windows users can downgrade directly from the Phidget Control Panel if they have driver version 1.9.20220112 or newer:
Firmware Version Numbering Schema
Phidgets device firmware is represented by a 3-digit number. For firmware patch notes, see the device history section on the Specifications tab on your device's product page.
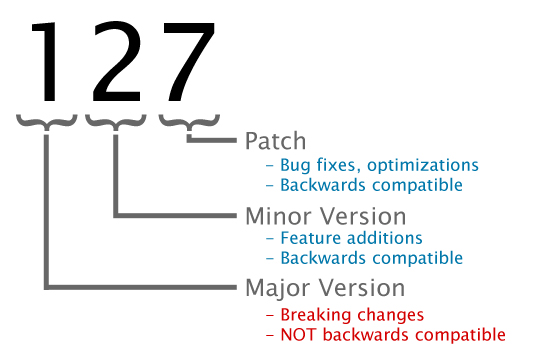
- If the digit in the 'ones' spot changes, it means there have been bug fixes or optimizations. Sometimes these changes can drastically improve the performance of the device, so you should still upgrade whenever possible. These upgrades are backwards compatible, meaning you can still use this Phidget on a computer that has Phidget22 drivers from before this firmware upgrade was released.
- If the digit in the 'tens' spot changes, it means some features were added (e.g. new API commands or events). These upgrades are also backwards compatible, in the sense that computers running old Phidget22 drivers will still be able to use the device, but they will not be able to use any of the new features this version added.
- If the digit in the 'hundreds' spot changes, it means a major change has occurred (e.g. a complete rewrite of the firmware or moving to a new architecture). These changes are not backwards compatible, so if you try to use the upgraded board on a computer with old Phidget22 drivers, it will show up as unsupported in the Control Panel and any applications build using the old libraries won't recognize it either. Sometimes, when a Phidget has a new hardware revision (e.g. 1018_2 -> 1018_3), the firmware version's hundreds digit will change because entirely new firmware was needed (usually because a change in the processor). In this case, older hardware revisions won't be able to be upgraded to the higher version number and instead continue to get bug fixes within the same major revision.
Bitmaps define images to be drawn on the screen of the Graphic LCD display. Bitmaps on the Graphic LCD display are made up of pixels arranged in a grid with a size defined when the bitmap is drawn. You can create a bitmap by defining a byte array of ones and zeroes. Ones are colored in, and zeroes are empty. If you put a line break after each row, it'll be easy to edit the bitmap. In C#, this may look something like this:
Byte[] heart = 	[0,0,0,0,0,
		 0,1,0,1,0,
		 1,1,1,1,1,
		 1,1,1,1,1,
		 0,1,1,1,0,
		 0,0,1,0,0,
		 0,0,0,0,0,
		 0,0,0,0,0];

gLCD.WriteBitmap(0, 0, 5, 8, heart);
Custom characters are images associated with given unicode characters. A custom character can be any arrangement of pixels within the space allotted for a single character. Single characters are made up of pixels arranged in a grid with a size defined by setFontSize().
As with regular bitmaps for the Graphic LCD display, you can create a character bitmap by defining a byte array of ones and zeroes. Ones are colored in, and zeroes are empty. If you put a line break after each row, it will be easy to edit the bitmap.
In C#, this may look something like this:
Byte[] heart = 	[0,0,0,0,0,
		 0,1,0,1,0,
		 1,1,1,1,1,
		 1,1,1,1,1,
		 0,1,1,1,0,
		 0,0,1,0,0,
		 0,0,0,0,0,
		 0,0,0,0,0];

gLCD.SetFontSize(LCDFont.User2, 5, 8);
gLCD.SetCharacterBitmap(LCDFont.User2,"\x6",heart);
Once stored, characters can be recalled into a text string by using the unicode value for the location (in this example, "\x6"). For example, in C#:
gLCD.WriteText(LCDFont.Dimensions_5x8, 0, 0,"I \x6 Phidgets!");
Custom characters on the LCD1100 are stored as images on the frame buffer. FONT_User1 is stored on frame buffer 1 and FONT_User2 is on frame buffer 2.
These characters occupy the same space as drawings on the framebuffer, and will be displayed onscreen if the framebuffer is flushed. The characters can also be overwritten by using drawing functions on the framebuffer, so it is recommended to only use a given framebuffer either for drawing or storing fonts, but not both.
We recommend using FONT_User2 (frame buffer 2) to store custom fonts, as it can be saved for later use.
In order to use the custom fonts, you must first define their size with setFontSize(). Once the font size is set, custom characters will be placed on the font's frame buffer at a location corresponding to the character number provided.
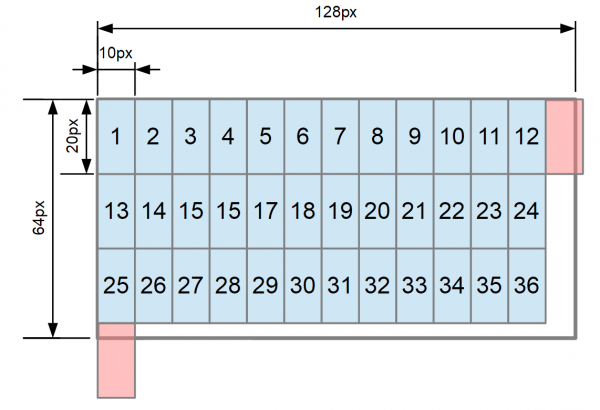
Characters for each font are stored in rows ordered left-to-right, top-to-bottom. Rows are filled with as many characters as will completely fit across the width of the screen. There are as many rows as will fit on the screen vertically.
On a screen 128 pixels wide by 64 pixels high, if your font is 10 pixels wide by 20 high, you will have 3 rows of 12 characters. This allows for a maximum of 36 characters of that size.
To quickly determine how many characters can be in your custom font, you can call getMaxCharacters() in your code.
Custom character indexing starts with character 0x01 and can be any character between 0x01 and the maximum number of characters that fit on screen.
To determine if an ascii character can be used in a given custom font, you can look at its corresponding ascii value on an ascii table to determine if it is within the limit determined above.

