|
Notice: This page contains information for the legacy Phidget21 Library. Phidget21 is out of support. Bugfixes may be considered on a case by case basis. Phidget21 does not support VINT Phidgets, or new USB Phidgets released after 2020. We maintain a selection of legacy devices for sale that are supported in Phidget21. We recommend that new projects be developed against the Phidget22 Library.
|
Template:UGsbc2
SBC Web Interface
Using the operating system sections of this guide, you should have been able to open a web browser with a connection to the SBC using either:
- The Phidget Control Panel (Windows), or
- The Phidget Preference Pane (Mac OS), or
- An mDNS connection (Linux).
Here we cover the basics on the tool that has been opened in the browser, known as the SBC Web Interface.
Set the Password
If this is your first time connecting to the SBC (or after a complete factory reset), you will see a screen asking you to set a password:
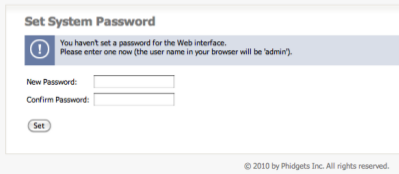
This password will be linked to the user admin if you use the web interface in the future, and to the user root if you choose to use SSH. These are actually the same user, and the SSH connection is covered in-depth on the SBC operating system page.
Remember this password, as you will need it to connect to the SBC in the future, and the only way to log in if you lose it is to perform a full factory reset on the SBC.
The next time you connect to the SBC after you log out or reboot the SBC, you will be asked to log in with a user name and password:
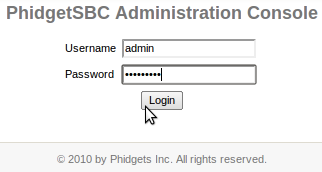
The SBC Web Interface has a series of tabs and sub-tabs at the top, and by using these you can access the entire web interface. Note that the web interface only allows you to configure a very small portion of the SBC, please refer to the full OS - Phidget SBC page for an in-depth introduction on the SBC Linux operating system.
The header also has information about how long the SBC had been powered on without a reboot, what the link local address of the SBC is (here it is phidgetsbc, so the full link local address is phidgetsbc.local) and more:

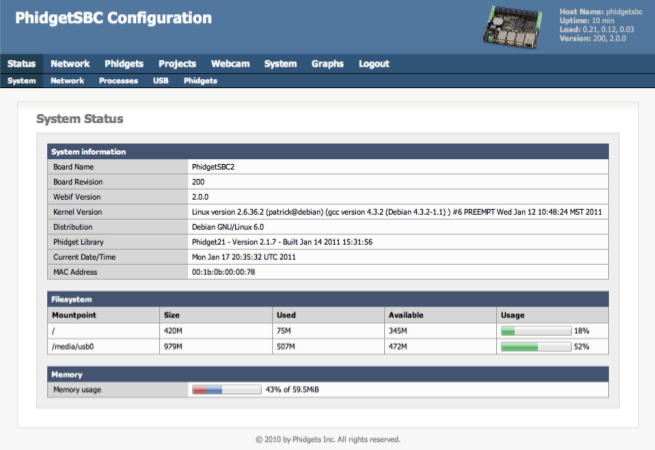
The starting page of the web interface will also give you information about:
- The name of the SBC (you can rename it under
System → General, although note that this will also change the link local address of the SBC to that name) - The build, kernel, and board revision
- The MAC address (of the Ethernet connection...the wireless MAC address can be found on
Network → Statuswhen the adapter is plugged in) - The space left in your / filesystem (the amount of space you have for programs, and files not written to an external USB key)
- Any additionally mounted filesystems (such as a USB data key)
- The amount of memory your SBC is currently using. This can be a bit misleading however. To get a better idea of the total memory usage go to the "Processes" subtab and look at memory usage on a per-process basis.
This can also be accessed later from Status → System:
Set up Networking
After using the initial wired Ethernet connection (as described in detail in the hardware section) to access the web interface for the first time, you can use the Network tab in the web interface to configure other network settings for use.
The SBC can switch dynamically between Ethernet (what it tries first) and wireless via the Wi-Fi USB Adapter w/SMA Antenna. It is also able to dynamically handle both Ethernet and wireless being unplugged and then plugged back in. This is especially useful if you are designing a project where the SBC will operate without a network - when testing you can plug in and remove the network adapters to check on how the SBC is doing.
Wireless
The SBC can only access wireless networks using the Wi-Fi USB Adapter w/SMA Antenna. If this WiFi adapter is plugged in to a USB port on the SBC, you will see something like this under Network → Wireless in the web interface:
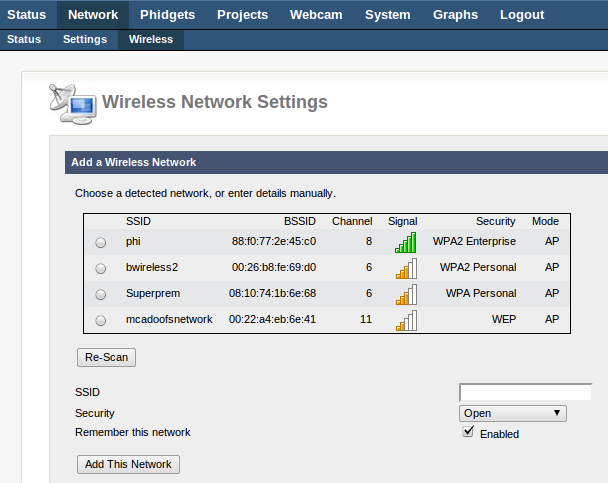
Here you can add and remember networks with passwords. These do not necessarily have to be networks that are currently seen - you can add the SSID and password of your home network, for example, and the next time the SBC boots at home with wireless only it will connect to your home wireless network. These SSID settings are only for DHCP networks.
Static IP
If you do not have DHCP on your main network, and do not want to use link local addressing, you can set the network connection to be static. These settings can be found in the web interface under Network → Settings for the Ethernet interface, and at the bottom of Network → Wireless for wireless networking. In the Ethernet settings, for example, you can specify network elements manually in the same way you would for a desktop computer:
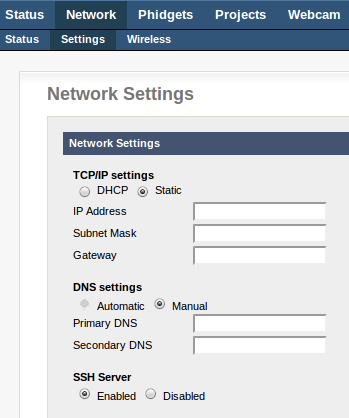
This setting is also useful to work entirely without mDNS and link local addressing. After setting it, the SBC will start using that static IP immediately, so if this is done improperly this can make the SBC very hard to re-connect to depending on the routing within the rest of your network. If you are not sure whether this will be a problem, it may help to read the in-depth network troubleshooting section for the SBC.
View Attached Phidgets
You can view Phidgets that are directly attached to the SBC by going to Phidgets → Status in the web interface:
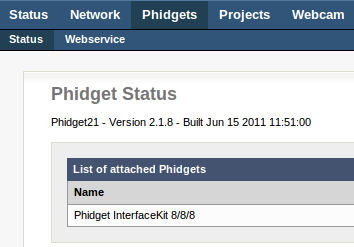
This will always show the attached Interface Kit that is part of the SBC board. It will also show any Phidgets plugged into the SBC's USB ports.
On the right hand side of this screen (not shown in the screenshot) you will see the serial numbers of the attached Phidgets. If you want to use these Phidgets within your code over a network using the webservice, you can use these serial numbers in your programming project.
Note that any analog or digital sensors will not show up here, as they are a 'part' of the Interface Kit and can be accessed through the ports in the Interface Kit API. Taking a look at the User Guide for the PhidgetInterfaceKit 8/8/8 will show you a good example of how this works.
Use the Webcam
Using the webcam (either the Phidget USB Webcam or another UVC-compatible webcam) should be fairly straightforward. Plug it in, then head to the web interface under Webcam → Webcam:
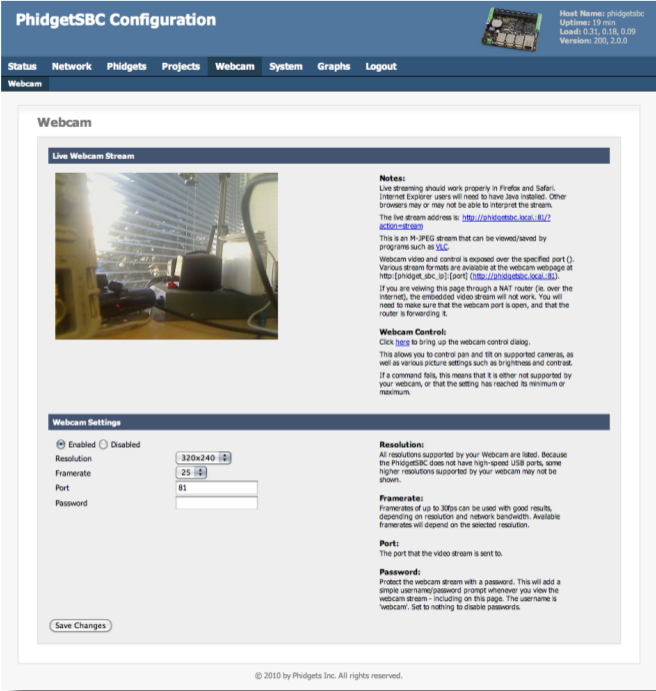
This will allow you to stream video into the web interface. This stream can also be viewed with any compatible M-JPG viewer, such as VLC. To take pictures with the webcam within your code, see the how-to on the main SBC operating system page.
Webcams that support pan/tilt can be controlled via the web interface. Multiple frame rates and resolutions are supported.
If the video stream is to be exported over the internet, it is recommended that the password be enabled. However, it must be noted that this is a simple HTTP authentication, which is sent unencrypted, and is thus not highly secure.
If prompted for the webcam password, the username is ‘webcam’.
If multiple webcams are attached, they will all start up using the same settings, except that each additional webcam will run on the next higher port number. Multiple webcams will generally only work when the resolution and framerate are set to low levels.
At this point, we have covered most of the common uses of the web interface. But the web interface offers many more configuration options. This reference section covers all of the available options. If you want to continue on to tasks such as writing and running code on the SBC, visit the OS - Phidget SBC page.
Can I use multiple webcams?
Probably... In theory you can connect multiple webcams to the SBC, however, the bandwidth of a USB1.1 hub will limit the amount of data you can stream meaning you might have to use reduces resolution/framerate to do it successfully.
