
Language - Java: Difference between revisions
No edit summary |
No edit summary |
||
| (108 intermediate revisions by 8 users not shown) | |||
| Line 1: | Line 1: | ||
{{#seo:|description=Learn how to use Phidget USB devices with Java.}} | |||
[[Category:Language]] | [[Category:Language]] | ||
==Get Started== | |||
With the Phidget22 library, it's easy to create Java applications that work with Phidget devices. | |||
== | ==Java Libraries== | ||
During development, we recommend downloading the appropriate installer or package for your [https://www.phidgets.com/docs/Operating_System_Support operating system]. This will place the required Phidget library files in standard locations where Java will look for them. When [[#Deploying Applications|deploying applications]], you can instead include these files manually as part of your application. | |||
====macOS Considerations==== | |||
Legacy Phidgets running a HID USB stack require a driver extension (macOS 10.15 and newer) or a kernel extension (macOS 10.14 and earlier). During development, we recommend downloading the appropriate [https://www.phidgets.com/docs/OS_-_macOS#Quick_Downloads package] which will install the extension. When deploying applications, review the README in the [https://cdn.phidgets.com/downloads/phidget22/libraries/macos/Phidget22_macosdevel.zip macOS Development Files] for information about bundling the extension with your application. | |||
== | =====Determining USB Stack===== | ||
To determine which USB stack your device is running, navigate to the product page and then to the specification tab, and look for the ''USB Stack'' specification. If you are using a VINT device, navigate to the product page for the VINT Hub you are using. | |||
[[Image:Javascript_networkserver_webusb_spec.png|center|600px|link=https://cdn.phidgets.com/docs/images/8/80/Javascript_networkserver_webusb_spec.png]] | |||
== | ====Linux Considerations==== | ||
Linux restricts access to USB devices to the root user. To run your Python application as a regular user, you'll need to [{{SERVER}}/docs/OS_-_Linux#Setting_Udev_Rules set up udev rules] on your system. | |||
==Development Environment Configuration== | |||
Before choosing a development environment, make sure you have the [http://www.oracle.com/technetwork/java/index.html Java Development Kit] installed. | |||
== | ===Visual Studio Code=== | ||
{| style="margin:auto;" class="table-no-border mw-collapsible mw-collapsed" | |||
=== | |+ '''Instructions''' | ||
Java | | To start developing with Java in VSCode, open it up and install the '''Extension Pack for Java'''.||[[Image:Language_java_vscode_extension2.png|center|350px|link=https://cdn.phidgets.com/docs/images/b/b4/Language_java_vscode_extension2.png]] | ||
|- | |||
| Next, press '''Ctrl+Shift+P''' to open the command palette, type "java" and select '''Java: Create Java Project'''. || [[Image:Language_java_vscode_createproj.png|center|360px|link=https://cdn.phidgets.com/docs/images/7/78/Language_java_vscode_createproj.png]] | |||
|- | |||
| Select "No Build Tools" and select a directory for the new project. You'll be asked for a project name, and VSCode will create the directory structure. || [[Image:Language_java_vscode_emptyproj.png|center|350px|link=https://cdn.phidgets.com/docs/images/c/c1/Language_java_vscode_emptyproj.png]] | |||
|- | |||
| colspan="2"|You'll need to get a copy of '''phidget22.jar''' to put inside the "lib" folder. [https://www.phidgets.com/downloads/phidget22/libraries/any/Phidget22Java.zip You can download phidget22.jar here]. | |||
|- | |||
| colspan="2"| You can now begin writing code in the newly created "App.java" file, or you can download a [[#Example_Code|sample program]] for your device and place it in the "src" folder. | |||
|- | |||
| Compile and run by pressing '''F5''' or by clicking the play button in the top right. || [[Image:Language_java_vscode_run.png|center|350px|link=https://cdn.phidgets.com/docs/images/e/ea/Language_java_vscode_run.png]] | |||
|- | |||
| Once you're ready to compile your project into a .jar executable, click on the '''Java Projects''' section in the explorer. || [[Image:Language_java_vscode_jar.png|center|350px|link=https://cdn.phidgets.com/docs/images/6/65/Language_java_vscode_jar.png]] | |||
|- | |||
| Click on the export icon, and then select your main class and click OK. || [[Image:Language_java_vscode_jar2.png|center|350px|link=https://cdn.phidgets.com/docs/images/7/74/Language_java_vscode_jar2.png]] | |||
|- | |||
| colspan="2"| Now you can run your new .jar file with the following command: | |||
<syntaxhighlight> | |||
java -jar Example.jar | |||
</syntaxhighlight> | |||
|} | |||
===Javac=== | |||
{| style="margin:auto;" class="table-no-border mw-collapsible mw-collapsed" | |||
===Javac | |+ '''Instructions''' | ||
|The easiest way to allow Java to access the Phidgets Java library is to place a copy of '''phidget22.jar''' in the same folder as your .java program. ||[[Image:Language_java_javac_folder.png|center|350px|link=https://cdn.phidgets.com/docs/images/8/89/Language_java_javac_folder.png]] | |||
|- | |||
|[https://www.phidgets.com/downloads/phidget22/libraries/any/Phidget22Java.zip You can download phidget22.jar here].|| | |||
|- | |||
|colspan="2"|To run your program, enter the following command in the command prompt or terminal: | |||
<syntaxhighlight> | |||
javac -classpath .;phidget22.jar example.java | |||
<syntaxhighlight | |||
javac -classpath .; | |||
</syntaxhighlight> | </syntaxhighlight> | ||
Then, enter the following command to run the program: | |||
<syntaxhighlight> | |||
java -classpath .;phidget22.jar example | |||
<syntaxhighlight | |||
java -classpath .; | |||
</syntaxhighlight> | </syntaxhighlight> | ||
|| | |||
|- | |||
| colspan="2"| Once you're ready to compile your project into a .jar executable, create a '''manifest.mf''' file with the following contents: | |||
<syntaxhighlight> | |||
<syntaxhighlight | |||
Manifest-Version: 1.0 | Manifest-Version: 1.0 | ||
Main-Class: example | Main-Class: example | ||
Class-Path: phidget22.jar | |||
</syntaxhighlight> | </syntaxhighlight> | ||
Make sure there's an empty newline at the bottom of the three lines and a space after each colon. | |||
|- | |||
| colspan="2"| Next, create the .jar file with this command: | |||
<syntaxhighlight> | |||
Next, create the . | jar cfm example.jar manifest.mf *.class | ||
<syntaxhighlight | |||
jar | |||
</syntaxhighlight> | </syntaxhighlight> | ||
Once the .jar is created, you can execute it with | |||
<syntaxhighlight> | |||
<syntaxhighlight | |||
java -jar example.jar | java -jar example.jar | ||
</syntaxhighlight> | </syntaxhighlight> | ||
|} | |||
===Netbeans=== | |||
{| style="margin:auto;" class="table-no-border mw-collapsible mw-collapsed" | |||
=== | |+ '''Instructions''' | ||
|The easiest way to allow Java to access the Phidgets Java library is to place a copy of '''phidget22.jar''' in the same folder as your .java program. ||[[Image:Language_java_javac_folder.png|center|350px|link=https://cdn.phidgets.com/docs/images/8/89/Language_java_javac_folder.png]] | |||
|- | |||
|[https://www.phidgets.com/downloads/phidget22/libraries/any/Phidget22Java.zip You can download phidget22.jar here].|| | |||
|- | |||
| To start, open NetBeans and create a new project. Select Java Application and follow the steps as directed by Netbeans.|| [[Image:Windows_netbeans1.jpg|center|350px|link=https://cdn.phidgets.com/docs/images/c/c9/Windows_netbeans1.jpg]] | |||
[[ | |- | ||
| Next, add a reference to phidget22.jar by right-clicking on the libraries folder. || [[Image:Windows_netbeans2.jpg|center|350px|link=https://cdn.phidgets.com/docs/images/2/2b/Windows_netbeans2.jpg]] | |||
|- | |||
| Navigate to the folder where you downloaded phidget22.jar, and select it. || [[Image:Windows_netbeans3.jpg|center|350px|link=https://cdn.phidgets.com/docs/images/7/76/Windows_netbeans3.jpg]] | |||
[[ | |- | ||
| The project now has access to Phidgets. By default, Netbeans should create an executable .jar file in the '''dist''' folder of the project directory when it's built. If it didn't, go to '''Build -> Packaging''' in the project properties and make sure "Build JAR after compiling" is checked.|| [[Image:Windows_netbeans4.png|center|350px|link=https://cdn.phidgets.com/docs/images/7/78/Windows_netbeans4.png]] | |||
|- | |||
| colspan="2"| You can now run the .jar file from the command prompt with: | |||
[[ | <syntaxhighlight> | ||
java -jar phidgetTest.jar | |||
<syntaxhighlight | |||
</syntaxhighlight> | </syntaxhighlight> | ||
|} | |||
===Eclipse=== | ===Eclipse=== | ||
{| style="margin:auto;" class="table-no-border mw-collapsible mw-collapsed" | |||
|+ '''Instructions''' | |||
| To start, open Eclipse and create a new Java project. Name the project and uncheck the '''create module-info.java file''' box.|| [[Image:java_eclipse_newproj.png|center|350px|link=https://cdn.phidgets.com/docs/images/9/97/Java_eclipse_newproj.png]] | |||
|- | |||
| On the Libraries tab, click Add External JARs and add [https://www.phidgets.com/downloads/phidget22/libraries/any/Phidget22Java.zip phidget22.jar]. to your project as an external jar. Be sure it's being added to the '''Classpath''' and not the module path. || [[Image:java_eclipse_library.png|center|350px|link=https://cdn.phidgets.com/docs/images/1/1b/Java_eclipse_library.png]] | |||
|- | |||
| Create a new Class in your project. || [[Image:java_eclipse_newclass.png|center|350px|link=https://cdn.phidgets.com/docs/images/0/02/Java_eclipse_newclass.png]] | |||
[[ | |- | ||
| Name the class, and be sure to check the '''public static void main''' box. Eclipse may require that you add a package name. || [[Image:java_eclipse_newclass2.png|center|350px|link=https://cdn.phidgets.com/docs/images/c/ca/Java_eclipse_newclass2.png]] | |||
|- | |||
| Your project now has access to Phidgets! || | |||
[[ | |- | ||
| Once you're ready to compile your project into a .jar executable, right click on the project in the package explorer and choose '''Export'''. Select '''Runnable JAR file'''. || [[Image:java_eclipse_export.png|center|350px|link=https://cdn.phidgets.com/docs/images/8/8c/Java_eclipse_export.png]] | |||
|- | |||
| Choose the main class and a destination for the .jar file and click finish. || [[Image:java_eclipse_export2.png|center|350px|link=https://cdn.phidgets.com/docs/images/8/8d/Java_eclipse_export2.png]] | |||
|- | |||
| colspan="2"| You can now run the .jar file from the command prompt with: | |||
<syntaxhighlight> | |||
java -jar phidgetTest.jar | |||
[[ | |||
[[ | |||
= | |||
< | |||
</syntaxhighlight> | </syntaxhighlight> | ||
|} | |||
===Android Studio=== | |||
{| style="margin:auto;" class="table-no-border mw-collapsible mw-collapsed" | |||
|+ '''Instructions''' | |||
| To start, create a new project in Android Studio.|| [[Image:java_as_newproj.png|center|350px|link=]] | |||
|- | |||
| Once you have a new project, be sure to switch the side bar to Project view. || [[Image:java_as_view.png|center|350px|link=]] | |||
|- | |||
| Next, download the [https://cdn.phidgets.com/downloads/phidget22/libraries/android/phidget22-android.zipPhidget22 Android Java libraries], extract the contents, and open the resulting folder. || [[Image:java_as_extract.png|center|350px|link=]] | |||
|- | |||
| Copy the .jar files into the '''app/libs/''' folder of your project. If you are only going to use network Phidgets in your app, then you don't need to copy Phidget22usb.jar into your project. | |||
Right click the jar files you just copied and select '''Add As Library.''' | |||
|[[Image:java_as_jnilibs.png|center|350px|link=]] | |||
|- | |||
|Create a directory called '''jnilibs''' under '''app/src/main''' || [[Image:java_as_jnilibs2.png|center|350px|link=]] | |||
|- | |||
| Copy the remaining folders from the Phidget22 library (containing versions of libphidget22java.so) into the directory you just created. || [[Image:java_as_jnilibs3.png|center|350px|link=]] | |||
|- | |||
| colspan="2"| To allow the use of the network and/or USB connections, the following lines must be added to your AndroidManifest.xml file: | |||
<syntaxhighlight> | |||
<!-- Required for network access --> | |||
<uses-permission android:name="android.permission.INTERNET" /> | |||
<!-- Required for USB access --> | |||
<uses-feature android:name="android.hardware.usb.host" /> | |||
</syntaxhighlight> | </syntaxhighlight> | ||
Finally, to import the Phidget22 library into your code, add the following line to the rest of your imports: | |||
<syntaxhighlight> | |||
import com.phidget22.*; | |||
<syntaxhighlight | |||
</syntaxhighlight> | </syntaxhighlight> | ||
The project now has access to Phidgets. Next, we'll walk through the steps for writing your own code. || | |||
|- | |||
| colspan="2"| | |||
By following the instructions for your operating system and compiler above, you now have working examples and a project that is configured. This teaching section will help you understand how the examples were written so you can start writing your own code. | |||
Your main reference for writing Android Java code will be: | |||
== | * The [https://www.phidgets.com/?view=api Phidget22 API] | ||
* The [https://www.phidgets.com/?view=code_samples&lang=Java Java example code] | |||
'''Step One: Initialize and Open''' | |||
You will need to declare your Phidget object in your code. For example, we can declare a digital input object like this: | |||
<syntaxhighlight lang="java"> | |||
DigitalInput device; | |||
</syntaxhighlight> | |||
Next, we need to initialize the method(s) that the Android device can communicate with the Phidget. This is done either by enabling Network Server Discovery, and/or allowing direct USB connections as follows: | |||
<syntaxhighlight lang="java"> | |||
//Enable server discovery to list remote Phidgets | |||
this.getSystemService(Context.NSD_SERVICE); | |||
Net.enableServerDiscovery(ServerType.DEVICE_REMOTE); | |||
//Allow direct USB connection of Phidgets | |||
com.phidget22.usb.Manager.Initialize(this); | |||
</syntaxhighlight> | |||
To support remote (network) Phidgets on Android API versions earlier than API version 16, or to connect to Phidget Network Servers with passwords, you will need to add the specific server to your program: | |||
<syntaxhighlight lang="java"> | |||
//Add a specific network server to communicate with Phidgets remotely | |||
Net.addServer("ServerName", "192.168.1.105", 5661, "password", 0); | |||
</syntaxhighlight> | |||
After the connection methods are established, the Phidget object needs to be initialized and opened: | |||
== | <syntaxhighlight lang="java"> | ||
device = new DigitalInput(); | |||
device.open(); | |||
</syntaxhighlight> | |||
Although we are not including it on this page, you should include error handling for all Phidget functions. Here is an example of the previous code with error handling: | |||
<syntaxhighlight lang="java"> | |||
try{ | |||
device = new DigitalInput(); | |||
device.open(); | |||
}catch (PhidgetException e) { | |||
e.printStackTrace(); | |||
} | |||
</syntaxhighlight> | </syntaxhighlight> | ||
For more information on error handling with Phidgets, see [[Handling Errors and Logging|this page]]. | |||
'''Step Two: Wait for Attachment (plugging in) of the Phidget''' | |||
Simply calling open does not guarantee you can use the Phidget immediately. To use a Phidget, it must be plugged in (attached). We can handle this by using event driven programming and tracking the attach events. Alternatively, we can modify our code so we wait for an attachment: | |||
< | <syntaxhighlight lang="java"> | ||
ch = new DigitalInput(); | |||
ch.open(5000); //wait for attach for 5 seconds, if not time out | |||
</syntaxhighlight> | </syntaxhighlight> | ||
Waiting for attachment will block indefinitely until a connection is made, or until the timeout value is exceeded. | |||
To use events, we have to modify our code: | |||
< | <syntaxhighlight lang="java"> | ||
ch = new DigitalInput(); | |||
device.addAttachListener(new AttachListener() { | |||
public void onAttach(final AttachEvent attachEvent) { | |||
AttachEventHandler handler = new AttachEventHandler(device); | |||
synchronized(handler) | |||
{ | |||
runOnUiThread(handler); | |||
try { | |||
handler.wait(); | |||
} catch (InterruptedException e) { | |||
e.printStackTrace(); | |||
} | |||
} | |||
} | |||
}); | |||
ch.open(); | |||
</syntaxhighlight> | </syntaxhighlight> | ||
Next, we have to declare the function that will be called when an attach event is fired - in this case the function AttachEventHandler will be called. | |||
< | <syntaxhighlight lang="java"> | ||
class AttachEventHandler implements Runnable { | |||
Phidget device; | |||
= | public AttachEventHandler(Phidget device) { | ||
this.device = device; | |||
} | |||
public void run() { | |||
TextView attachedTxt = (TextView) findViewById(R.id.attachedTxt); | |||
attachedTxt.setText("Attached"); | |||
//notify that we're done | |||
synchronized(this) | |||
{ | |||
this.notify(); | |||
} | |||
} | |||
} | |||
</syntaxhighlight> | </syntaxhighlight> | ||
''' | '''Step Three: Do Things with the Phidget''' | ||
We recommend the use of event driven programming when working with Phidgets. In a similar way to handling an attach event as described above, we can also add an event handler for a state change event: | |||
< | <syntaxhighlight lang="java"> | ||
ch = new DigitalInput(); | |||
device.addStateChangeListener(new DigitalInputStateChangeListener() { | |||
public void onStateChange(DigitalInputStateChangeEvent stateChangeEvent) { | |||
DigitalInputStateChangeEventHandler handler = | |||
new DigitalInputStateChangeEventHandler(device, stateChangeEvent); | |||
runOnUiThread(handler); | |||
} | |||
}); | |||
ch.open(); | |||
</syntaxhighlight> | </syntaxhighlight> | ||
This code will connect a function and an event. In this case, the '''DigitalInputStateChangeEventHandler''' function will be called when there has been a change to the devices input. | |||
Next, we need to create the '''DigitalInputStateChangeEventHandler''' function itself: | |||
<syntaxhighlight lang="java"> | |||
class DigitalInputStateChangeEventHandler implements Runnable { | |||
Phidget device; | |||
DigitalInputStateChangeEvent stateChangeEvent; | |||
public DigitalInputStateChangeEventHandler(Phidget device, | |||
DigitalInputStateChangeEvent stateChangeEvent) | |||
{ | |||
this.device = device; | |||
this.stateChangeEvent = stateChangeEvent; | |||
} | |||
= | public void run() { | ||
CheckBox stateBox = (CheckBox) findViewById(R.id.stateBox); | |||
stateBox.setChecked(stateChangeEvent.getState()); | |||
} | |||
} | |||
</syntaxhighlight> | |||
If events do not suit your needs, you can also poll the device directly for data using code like this: | |||
<syntaxhighlight lang="java"> | |||
boolean state = ch.getState(); | |||
</syntaxhighlight> | |||
'''Step Four: Close and Delete''' | |||
At the end of your program, be sure to close your device. | |||
<syntaxhighlight lang="java"> | |||
ch.close(); | |||
</syntaxhighlight> | |||
Once the device is closed, to completely clean up after using Phidgets, you must uninitialize the USB connection as follows: | |||
<syntaxhighlight lang="java"> | |||
//Disable USB connection to Phidgets | |||
com.phidget22.usb.Manager.Uninitialize(); | |||
< | |||
</syntaxhighlight> | </syntaxhighlight> | ||
Now that you've set up Phidgets in your programming environment, you should read our guide on [[Phidget Programming Basics]] to learn the fundamentals of programming with Phidgets. | |||
|} | |||
== | === PhidgetSBC Web Interface === | ||
{| style="margin:auto;" class="table-no-border mw-collapsible mw-collapsed" | |||
|+'''Instructions''' | |||
|<center>{{#ev:youtube|gZmWvWXICIA|rel=0}}</center> | |||
'''Note:''' Debian Linux may not have support for the newest JDK by default, so if you're developing your code on another machine, you may have to target an older version of Java in order to run it on the PhidgetSBC. | |||
|} | |||
==Example Code== | |||
Navigate to our [https://www.phidgets.com/?view=code_samples&lang=Java Code Sample Generator] to view and download code samples that are tailored to your specific device. | |||
[[Image:Language_java_codesample.png|center|600px|link=https://cdn.phidgets.com/docs/images/a/af/Language_java_codesample.png]] | |||
{{ | ===Phidget Programming Basics=== | ||
{{PhidgetProgrammingBasicsLink}} | |||
== | == Deploying Applications == | ||
The following files are required for your Java application: | |||
* phidget22.jar | |||
* phidget22.dll | |||
* phidget22java.dll | |||
The files can be found in the [https://cdn.phidgets.com/downloads/phidget22/libraries/windows/Phidget22-windevel.zip Development Files]. The .jar file is in lib/java, and the dll files are in lib/c/x64. | |||
[ | |||
Java will look for these files in several locations, including the classpath and the working folder of the project. | |||
==API== | |||
[{{SERVER}}/?view=api&lang=Python Phidget22 API] | |||
Latest revision as of 21:33, 25 May 2026
Get Started
With the Phidget22 library, it's easy to create Java applications that work with Phidget devices.
Java Libraries
During development, we recommend downloading the appropriate installer or package for your operating system. This will place the required Phidget library files in standard locations where Java will look for them. When deploying applications, you can instead include these files manually as part of your application.
macOS Considerations
Legacy Phidgets running a HID USB stack require a driver extension (macOS 10.15 and newer) or a kernel extension (macOS 10.14 and earlier). During development, we recommend downloading the appropriate package which will install the extension. When deploying applications, review the README in the macOS Development Files for information about bundling the extension with your application.
Determining USB Stack
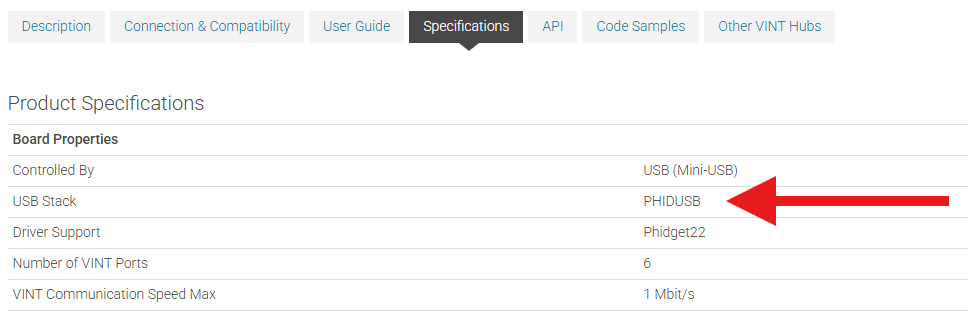
To determine which USB stack your device is running, navigate to the product page and then to the specification tab, and look for the USB Stack specification. If you are using a VINT device, navigate to the product page for the VINT Hub you are using.
Linux Considerations
Linux restricts access to USB devices to the root user. To run your Python application as a regular user, you'll need to set up udev rules on your system.
Development Environment Configuration
Before choosing a development environment, make sure you have the Java Development Kit installed.
Visual Studio Code
| To start developing with Java in VSCode, open it up and install the Extension Pack for Java. | 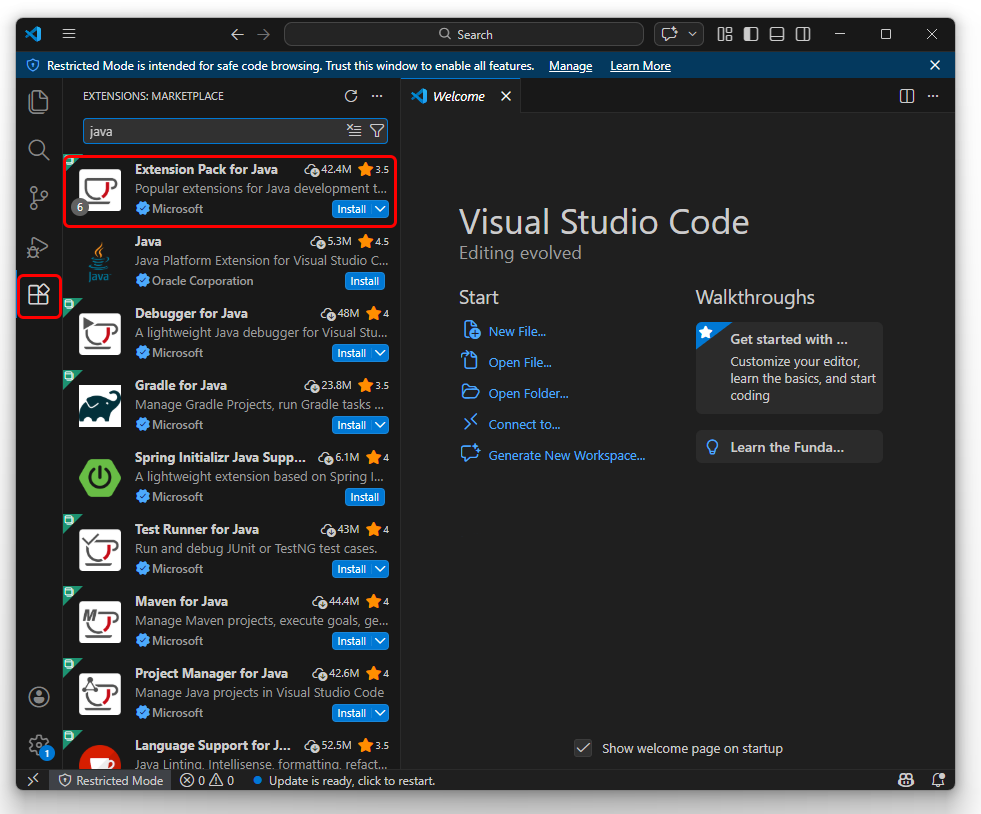 |
| Next, press Ctrl+Shift+P to open the command palette, type "java" and select Java: Create Java Project. | 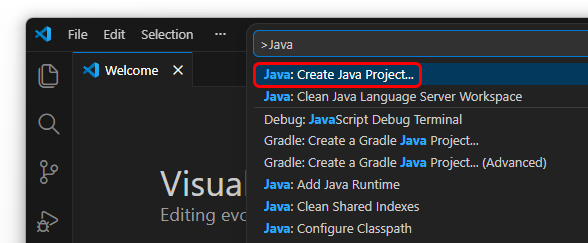 |
| Select "No Build Tools" and select a directory for the new project. You'll be asked for a project name, and VSCode will create the directory structure. | 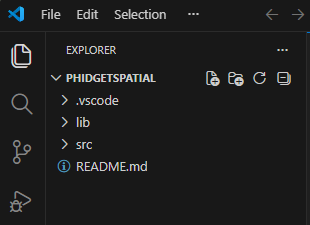 |
| You'll need to get a copy of phidget22.jar to put inside the "lib" folder. You can download phidget22.jar here. | |
| You can now begin writing code in the newly created "App.java" file, or you can download a sample program for your device and place it in the "src" folder. | |
| Compile and run by pressing F5 or by clicking the play button in the top right. | 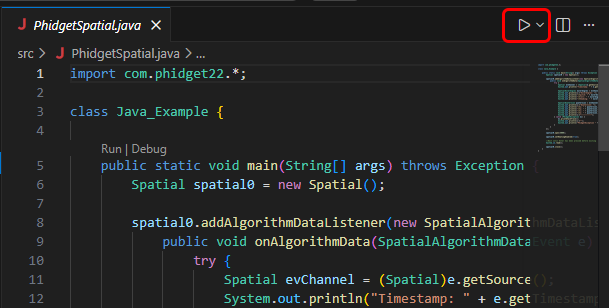 |
| Once you're ready to compile your project into a .jar executable, click on the Java Projects section in the explorer. | 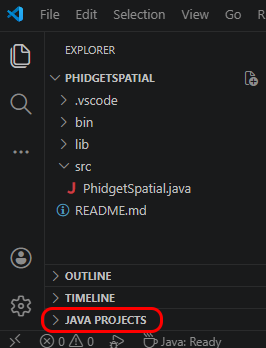 |
| Click on the export icon, and then select your main class and click OK. | 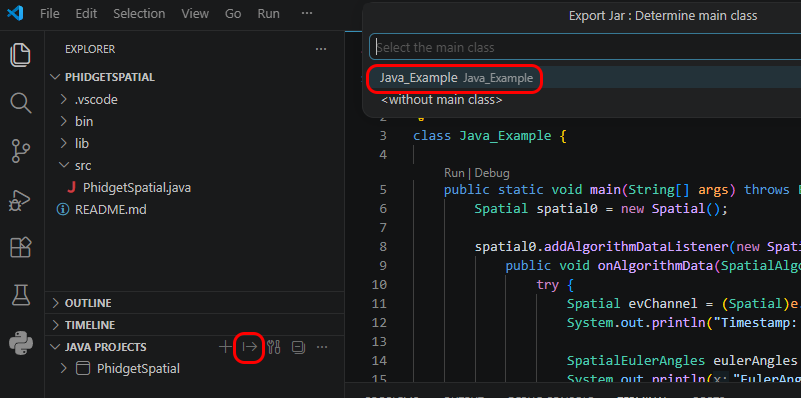 |
Now you can run your new .jar file with the following command:
java -jar Example.jar | |
Javac
| The easiest way to allow Java to access the Phidgets Java library is to place a copy of phidget22.jar in the same folder as your .java program. | 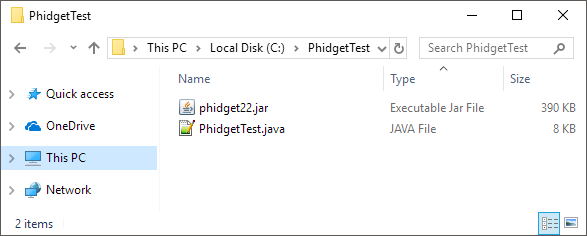 | |
| You can download phidget22.jar here. | ||
To run your program, enter the following command in the command prompt or terminal:
javac -classpath .;phidget22.jar example.javaThen, enter the following command to run the program: java -classpath .;phidget22.jar example |
||
Once you're ready to compile your project into a .jar executable, create a manifest.mf file with the following contents:
Manifest-Version: 1.0
Main-Class: example
Class-Path: phidget22.jar
Make sure there's an empty newline at the bottom of the three lines and a space after each colon. | ||
Next, create the .jar file with this command:
jar cfm example.jar manifest.mf *.classOnce the .jar is created, you can execute it with java -jar example.jar | ||
Netbeans
| The easiest way to allow Java to access the Phidgets Java library is to place a copy of phidget22.jar in the same folder as your .java program. | |
| You can download phidget22.jar here. | |
| To start, open NetBeans and create a new project. Select Java Application and follow the steps as directed by Netbeans. | 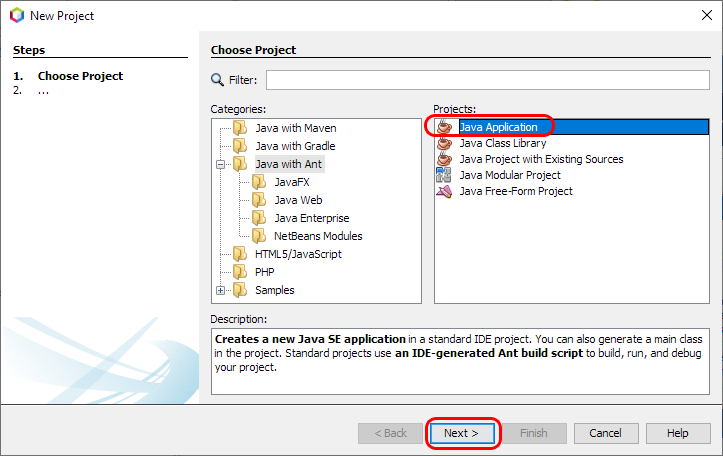 |
| Next, add a reference to phidget22.jar by right-clicking on the libraries folder. | 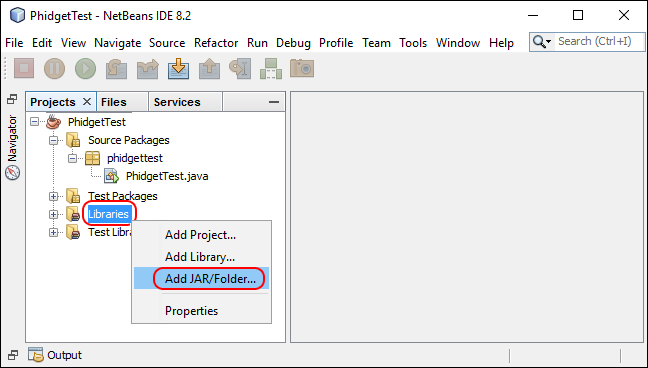 |
| Navigate to the folder where you downloaded phidget22.jar, and select it. | 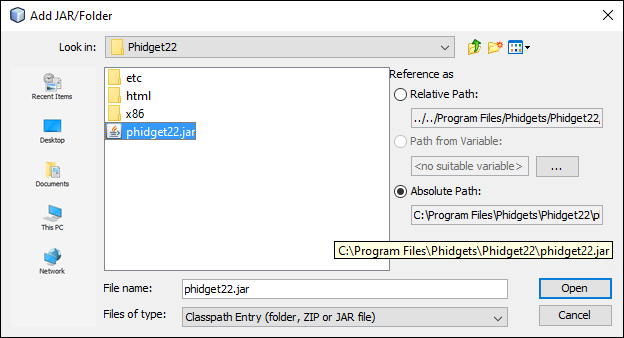 |
| The project now has access to Phidgets. By default, Netbeans should create an executable .jar file in the dist folder of the project directory when it's built. If it didn't, go to Build -> Packaging in the project properties and make sure "Build JAR after compiling" is checked. | 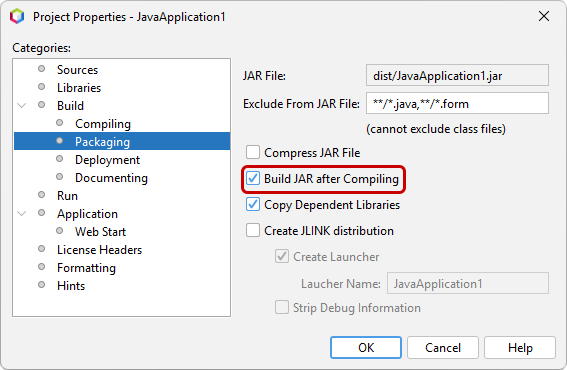 |
You can now run the .jar file from the command prompt with:
java -jar phidgetTest.jar | |
Eclipse
| To start, open Eclipse and create a new Java project. Name the project and uncheck the create module-info.java file box. | 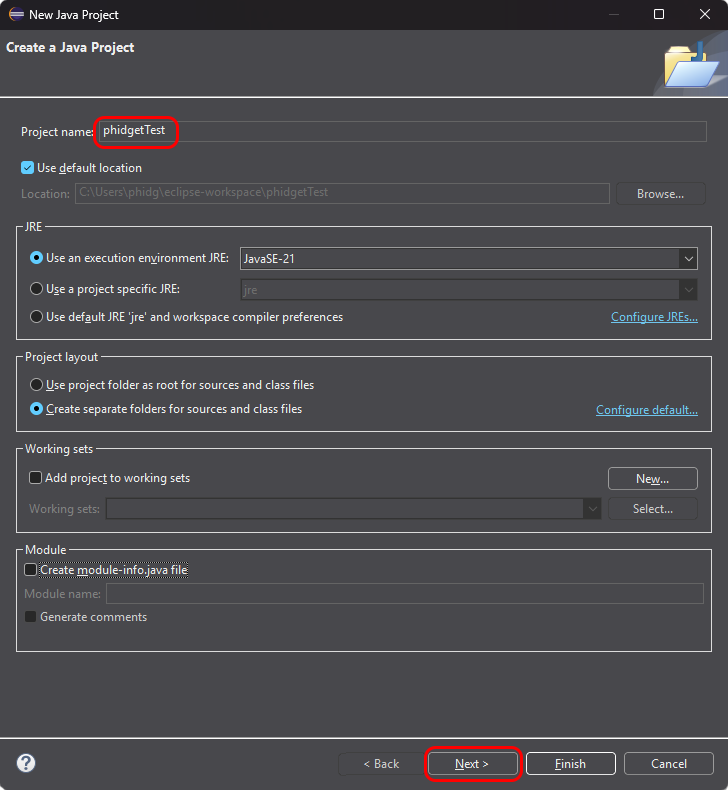 |
| On the Libraries tab, click Add External JARs and add phidget22.jar. to your project as an external jar. Be sure it's being added to the Classpath and not the module path. | 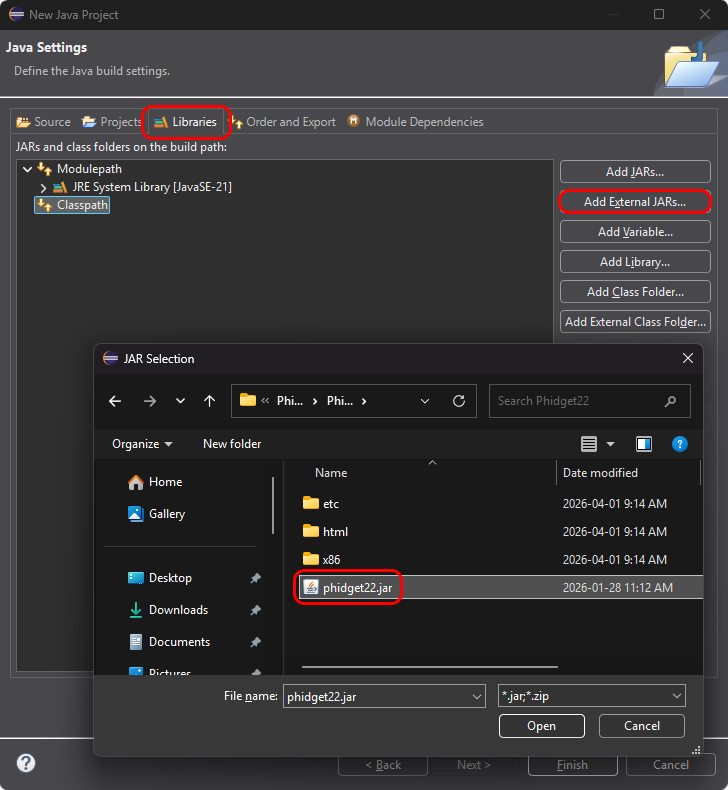 |
| Create a new Class in your project. | 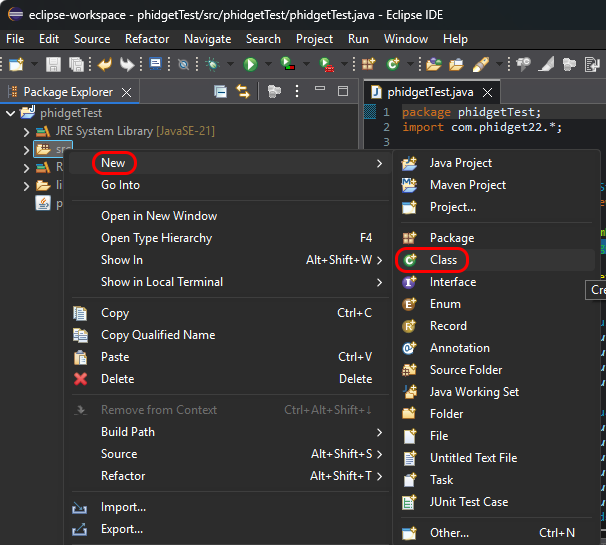 |
| Name the class, and be sure to check the public static void main box. Eclipse may require that you add a package name. | 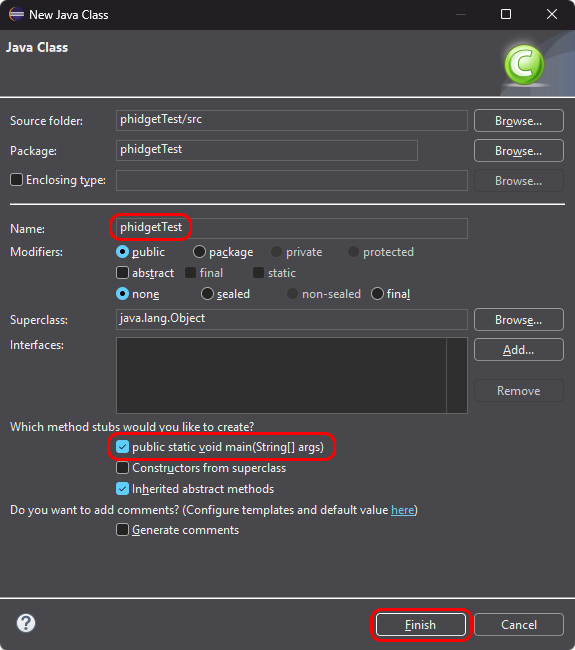 |
| Your project now has access to Phidgets! | |
| Once you're ready to compile your project into a .jar executable, right click on the project in the package explorer and choose Export. Select Runnable JAR file. | 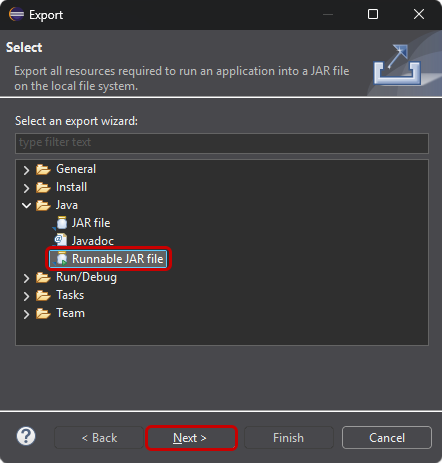 |
| Choose the main class and a destination for the .jar file and click finish. | 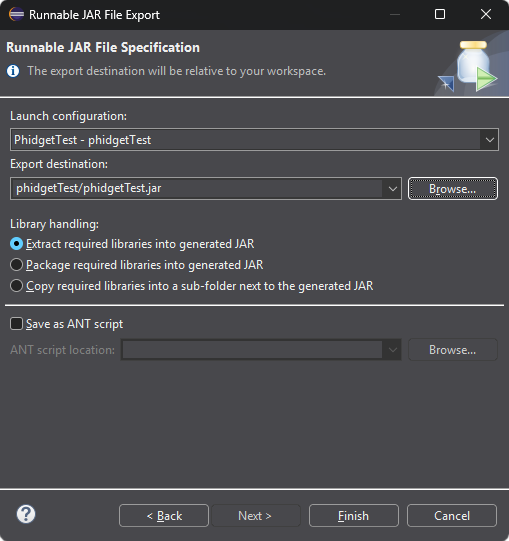 |
You can now run the .jar file from the command prompt with:
java -jar phidgetTest.jar | |
Android Studio
| To start, create a new project in Android Studio. | 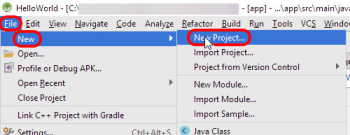 |
| Once you have a new project, be sure to switch the side bar to Project view. | 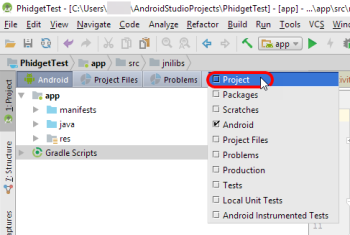 |
| Next, download the Android Java libraries, extract the contents, and open the resulting folder. | 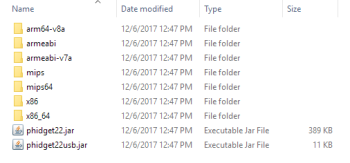 |
| Copy the .jar files into the app/libs/ folder of your project. If you are only going to use network Phidgets in your app, then you don't need to copy Phidget22usb.jar into your project.
Right click the jar files you just copied and select Add As Library. |
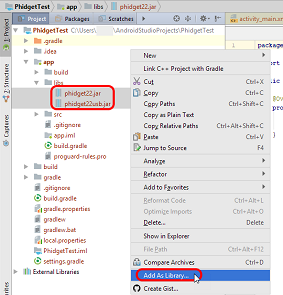 |
| Create a directory called jnilibs under app/src/main | 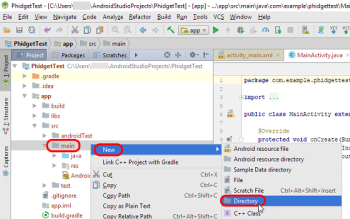 |
| Copy the remaining folders from the Phidget22 library (containing versions of libphidget22java.so) into the directory you just created. | 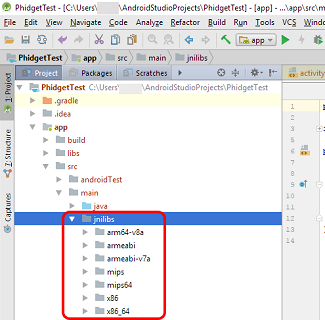 |
To allow the use of the network and/or USB connections, the following lines must be added to your AndroidManifest.xml file:
<!-- Required for network access -->
<uses-permission android:name="android.permission.INTERNET" />

<!-- Required for USB access -->
<uses-feature android:name="android.hardware.usb.host" />
Finally, to import the Phidget22 library into your code, add the following line to the rest of your imports: import com.phidget22.*;The project now has access to Phidgets. Next, we'll walk through the steps for writing your own code. || | |
|
By following the instructions for your operating system and compiler above, you now have working examples and a project that is configured. This teaching section will help you understand how the examples were written so you can start writing your own code. Your main reference for writing Android Java code will be:
Step One: Initialize and Open You will need to declare your Phidget object in your code. For example, we can declare a digital input object like this: DigitalInput device;
Next, we need to initialize the method(s) that the Android device can communicate with the Phidget. This is done either by enabling Network Server Discovery, and/or allowing direct USB connections as follows: //Enable server discovery to list remote Phidgets
this.getSystemService(Context.NSD_SERVICE);
Net.enableServerDiscovery(ServerType.DEVICE_REMOTE);
//Allow direct USB connection of Phidgets
com.phidget22.usb.Manager.Initialize(this);
To support remote (network) Phidgets on Android API versions earlier than API version 16, or to connect to Phidget Network Servers with passwords, you will need to add the specific server to your program: //Add a specific network server to communicate with Phidgets remotely
Net.addServer("ServerName", "192.168.1.105", 5661, "password", 0);
After the connection methods are established, the Phidget object needs to be initialized and opened: device = new DigitalInput();
device.open();
Although we are not including it on this page, you should include error handling for all Phidget functions. Here is an example of the previous code with error handling: try{
device = new DigitalInput();
device.open();
}catch (PhidgetException e) {
e.printStackTrace();
}
For more information on error handling with Phidgets, see this page. Step Two: Wait for Attachment (plugging in) of the Phidget Simply calling open does not guarantee you can use the Phidget immediately. To use a Phidget, it must be plugged in (attached). We can handle this by using event driven programming and tracking the attach events. Alternatively, we can modify our code so we wait for an attachment: ch = new DigitalInput();
ch.open(5000); //wait for attach for 5 seconds, if not time out
Waiting for attachment will block indefinitely until a connection is made, or until the timeout value is exceeded. To use events, we have to modify our code: ch = new DigitalInput();
device.addAttachListener(new AttachListener() {
public void onAttach(final AttachEvent attachEvent) {
AttachEventHandler handler = new AttachEventHandler(device);
synchronized(handler)
{
runOnUiThread(handler);
try {
handler.wait();
} catch (InterruptedException e) {
e.printStackTrace();
}
}
}
});
ch.open();
Next, we have to declare the function that will be called when an attach event is fired - in this case the function AttachEventHandler will be called. class AttachEventHandler implements Runnable {
Phidget device;
public AttachEventHandler(Phidget device) {
this.device = device;
}
public void run() {
TextView attachedTxt = (TextView) findViewById(R.id.attachedTxt);
attachedTxt.setText("Attached");
//notify that we're done
synchronized(this)
{
this.notify();
}
}
}
Step Three: Do Things with the Phidget We recommend the use of event driven programming when working with Phidgets. In a similar way to handling an attach event as described above, we can also add an event handler for a state change event: ch = new DigitalInput();
device.addStateChangeListener(new DigitalInputStateChangeListener() {
public void onStateChange(DigitalInputStateChangeEvent stateChangeEvent) {
DigitalInputStateChangeEventHandler handler =
new DigitalInputStateChangeEventHandler(device, stateChangeEvent);
runOnUiThread(handler);
}
});
ch.open();
This code will connect a function and an event. In this case, the DigitalInputStateChangeEventHandler function will be called when there has been a change to the devices input. Next, we need to create the DigitalInputStateChangeEventHandler function itself: class DigitalInputStateChangeEventHandler implements Runnable {
Phidget device;
DigitalInputStateChangeEvent stateChangeEvent;
public DigitalInputStateChangeEventHandler(Phidget device,
DigitalInputStateChangeEvent stateChangeEvent)
{
this.device = device;
this.stateChangeEvent = stateChangeEvent;
}
public void run() {
CheckBox stateBox = (CheckBox) findViewById(R.id.stateBox);
stateBox.setChecked(stateChangeEvent.getState());
}
}
If events do not suit your needs, you can also poll the device directly for data using code like this: boolean state = ch.getState();
Step Four: Close and Delete At the end of your program, be sure to close your device. ch.close();
Once the device is closed, to completely clean up after using Phidgets, you must uninitialize the USB connection as follows: //Disable USB connection to Phidgets
com.phidget22.usb.Manager.Uninitialize();
Now that you've set up Phidgets in your programming environment, you should read our guide on Phidget Programming Basics to learn the fundamentals of programming with Phidgets. | |
PhidgetSBC Web Interface
Note: Debian Linux may not have support for the newest JDK by default, so if you're developing your code on another machine, you may have to target an older version of Java in order to run it on the PhidgetSBC. |
Example Code
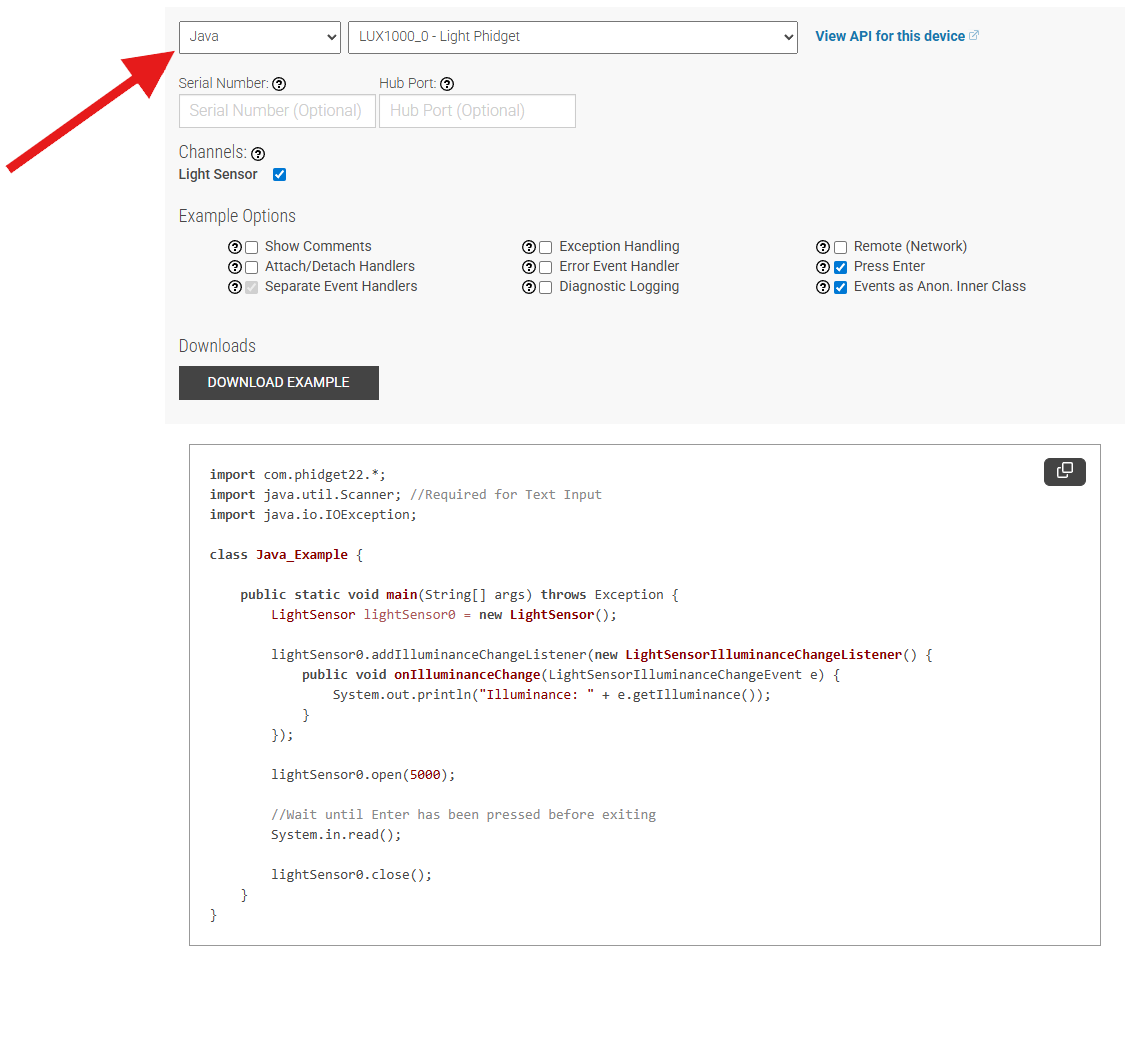
Navigate to our Code Sample Generator to view and download code samples that are tailored to your specific device.
Phidget Programming Basics
To learn more about the structure of the example code, visit our Phidget Programming Basics guide.
Deploying Applications
The following files are required for your Java application:
- phidget22.jar
- phidget22.dll
- phidget22java.dll
The files can be found in the Development Files. The .jar file is in lib/java, and the dll files are in lib/c/x64.
Java will look for these files in several locations, including the classpath and the working folder of the project.
