|
|
| (28 intermediate revisions by 4 users not shown) |
| Line 1: |
Line 1: |
| | {{#seo:|description=Learn how to use Phidget USB devices with Python.}} |
| [[Category:Language]] | | [[Category:Language]] |
| __TOC__
| |
|
| |
|
| | ==Get Started== |
| | With the Phidget22 Python library, it's easy to create Python applications that work with Phidget devices. |
|
| |
|
| == Quick Downloads == | | ==Python Libraries== |
| | ===pip Package=== |
| | The Phidget22 Python library is available as a [https://pypi.org/project/phidget22/ pip package]. Most development environments provide built-in tools to manage packages. View the [[#Development Environment Configuration | Development Environment Configuration]] section below for examples. |
|
| |
|
| === Documentation === | | ====macOS Considerations==== |
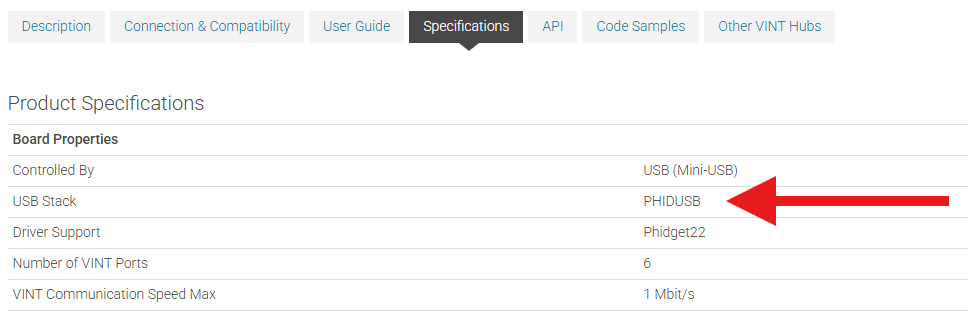
| | Phidget devices running a HID USB stack require the installation of the macOS libraries or the standalone Phidget Control Panel ([{{SERVER}}/docs/OS_-_macOS download here]). |
|
| |
|
| *{{Phidget22API}} (Select Python from drop-down menu)
| | To determine what USB stack your Phidget device is on, navigate to the product page and then to the specification tab, and look for the ''USB Stack'' specification. If you are using a VINT device, navigate to the product page for the VINT Hub you are using. |
|
| |
|
| === Example Code === | | [[Image:Javascript_networkserver_webusb_spec.png|center|600px|link=https://cdn.phidgets.com/docs/images/8/80/Javascript_networkserver_webusb_spec.png]] |
|
| |
|
| *{{SampleCode|Python|Python Examples}}
| | ====Linux Considerations==== |
| | Linux restricts access to USB devices to the root user. To run your Python application as a regular user, you'll need to [{{SERVER}}/docs/OS_-_Linux#Setting_Udev_Rules set up udev rules] on your system. |
|
| |
|
| === Libraries === | | ===Source Files=== |
| | The Phidget22 Python library source files are available [https://cdn.phidgets.com/downloads/phidget22/libraries/any/Phidget22Python.zip here]. |
|
| |
|
| {{AllQuickDownloads}}
| | ==Development Environment Configuration== |
| | Most development environments provide built-in tools to manage Python interpreters, packages, and virtual environments. See the examples below for more information. |
| | ===Installing a Python Interpreter=== |
| | If you don't already have a Python interpreter installed, you can download and install one from [https://www.python.org/downloads/ python.org] or through package managers like [https://brew.sh/ Homebrew]. |
|
| |
|
| == Getting Started with Python == | | ===Visual Studio Code=== |
| Welcome to using Phidgets with Python! By using Python, you will have access to the complete {{Phidget22API}}, including events. We also provide example code in Python for all Phidget devices.
| | {| style="margin:auto;" class="table-no-border mw-collapsible mw-collapsed" |
| | | |+ '''Instructions''' |
| If you are developing for Windows, keep reading. Otherwise, select your operating system to jump ahead:
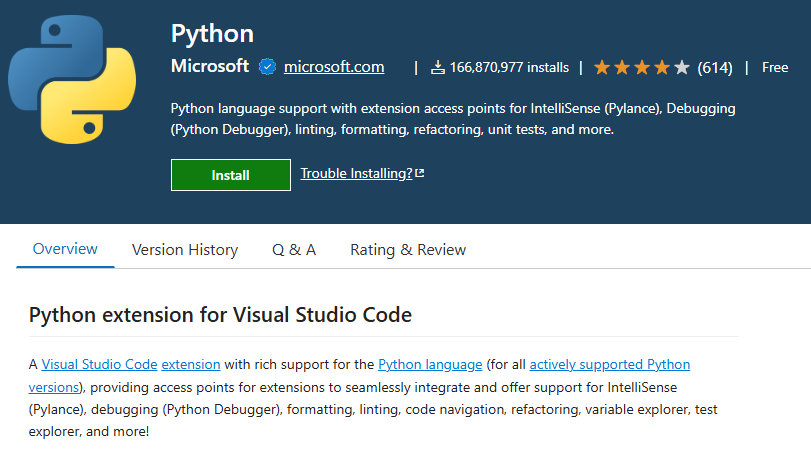
| | | Install the [https://marketplace.visualstudio.com/items?itemName=ms-python.python Python extension for Visual Studio Code].|| [[Image:Language_python_vscode_install.png|center|350px|link=https://cdn.phidgets.com/docs/images/f/f9/Language_python_vscode_install.png]] |
| *[[#macOS | macOS]]
| | |- |
| *[[#Linux | Linux]]
| | | Next, create a directory and open it in Visual Studio Code. You can do this by opening Visual Studio Code and selecting '''File > Open Folder...''' || [[Image:Language_python_vscode_newfolder.png|center|350px|link=https://cdn.phidgets.com/docs/images/f/f8/Language_python_vscode_newfolder.png]] |
| == Windows ==
| | |- |
| {{Windows_Languages}}
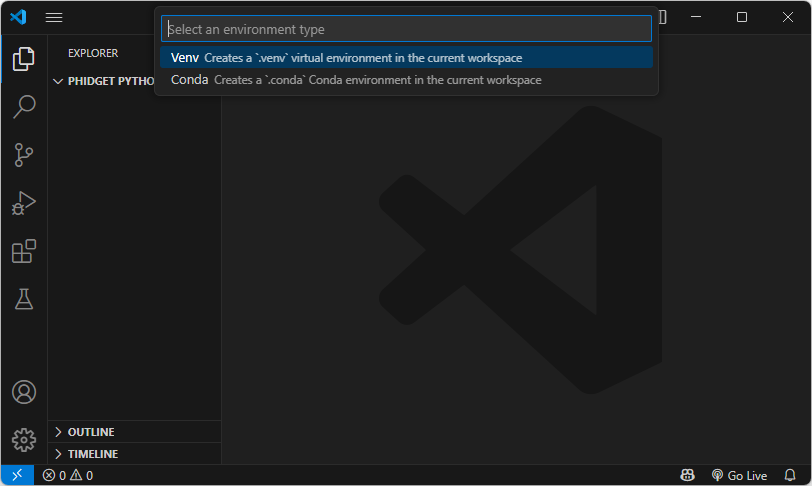
| | | Open the Command Palette (Ctrl + Shift + P), type '''Python: Create Environment''', and press Enter. Select '''Venv''' when prompted. || [[Image:Language_python_vscode_newvenv.png|center|350px|link=https://cdn.phidgets.com/docs/images/a/a6/Language_python_vscode_newvenv.png]] |
| | | |- |
| ===Install Phidget Python module for Windows===
| | | Next, select your preferred Python interpreter from the list. You may need to browse to find it. || [[Image:Language_python_vscode_selectinterpreter.png|center|350px|link=https://cdn.phidgets.com/docs/images/2/20/Language_python_vscode_selectinterpreter.png]] |
| Before getting started with the guides below, ensure you have [https://www.python.org/downloads/ Python] installed on your machine (both 2.7 and 3.6 are compatible with Phidgets). You will also need to download the [{{SERVER}}/downloads/phidget22/libraries/any/Phidget22Python/zip Phidget Python module].
| | |- |
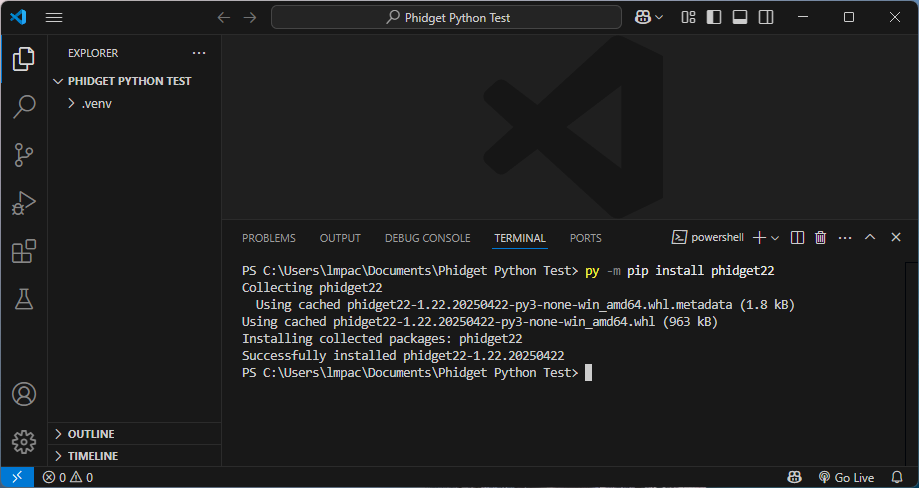
| | | | Open a new terminal. You can do this through the Command Palette again (Ctrl + Shift + P), by typing '''Terminal: Create New Terminal'''. Install the Phidget22 pip package: |
| After unpacking the Phidget Python module, open the command prompt at folder location and enter the following command:
| |
| <syntaxhighlight lang=python>
| |
| python setup.py install
| |
| </syntaxhighlight>
| |
| | |
| This will build the module and install the Python module files into your site-packages directory.
| |
| | |
| [[File:Python_install.png|link=|center]] | |
| | |
| ===Command Line===
| |
| ====Use Our Examples====
| |
| One of the best ways to start programming with Phidgets is to use our example code as a guide. Before we get started, make sure you have read [[#Install Phidget Python module for Windows | how to install the Phidget Python module]] section above.
| |
| | |
| | |
| Now that you have Python and the Phidget Python module installed, select an example that will work with your Phidget:
| |
| *{{SampleCode|Python|Python Examples}}
| |
| | |
| | |
| Open the command prompt at the location of the example and enter the following command:
| |
| <syntaxhighlight lang=bash> | | <syntaxhighlight lang=bash> |
| python example.py
| | #Windows |
| </syntaxhighlight>
| | py -m pip install phidget22 |
| | |
| | |
| [[Image:Python_command_run.png|link=|center]]
| |
| | |
| | |
| You should now have the example up and running for your device. Play around with the device and experiment with some of the functionality. When you are ready, the next step is configuring your project and writing your own code!
| |
| | |
| ====Configure your project====
| |
| When you are building a project from scratch, or adding Phidget functionality to an existing project, you'll need to configure your development environment to properly link the Phidget Java library.
| |
| | |
| | |
| To include the Phidget Python library, add the following line to your code:
| |
| | |
| <syntaxhighlight lang=python>
| |
| from Phidget22.PhidgetException import *
| |
| from Phidget22.Phidget import *
| |
| </syntaxhighlight>
| |
|
| |
|
| Then, you will also have to add a reference to your particular Phidget. For example, you would include the following line for a DigitalInput:
| | #macOS |
| | python3 -m pip install phidget22 |
|
| |
|
| <syntaxhighlight lang=python>
| | #Linux (Debian) |
| from Phidget22.Devices.DigitalInput import *
| | python3 -m pip install phidget22 |
| </syntaxhighlight> | | </syntaxhighlight> |
| | || [[Image:Language_python_vscode_installpackage.png|center|350px|link=https://cdn.phidgets.com/docs/images/a/a8/Language_python_vscode_installpackage.png]] |
| | |- |
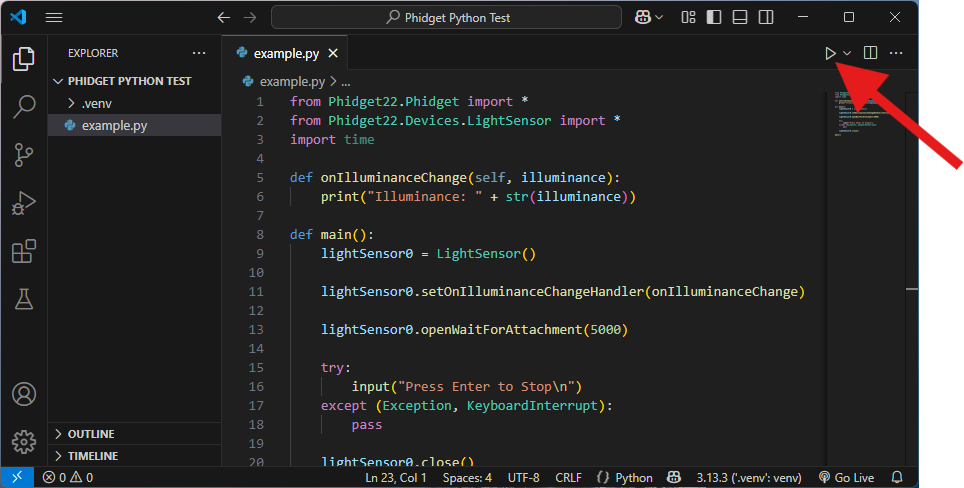
| | | Finally, add your Python file and run it using the button in the top right corner.|| [[Image:Language_python_vscode_runcode.png|center|350px|link=https://cdn.phidgets.com/docs/images/9/96/Language_python_vscode_runcode.png]] |
| | |- |
| | |} |
|
| |
|
| You can now compile the file as shown in the previous section.
| | ===PyCharm=== |
| | | {| style="margin:auto;" class="table-no-border mw-collapsible mw-collapsed" |
| | | |+ '''Instructions''' |
| The project now has access to Phidgets. Next, view the [[#Write Code | write your own code]] section located below.
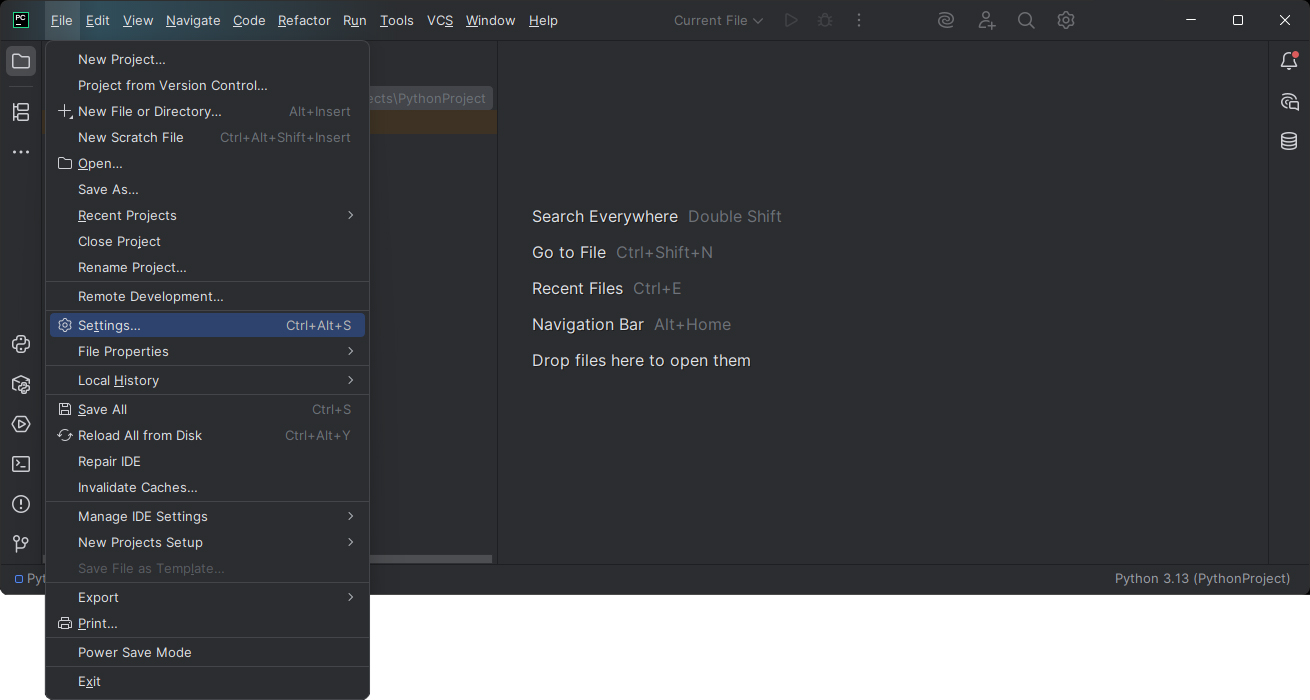
| | | Create your PyCharm project and navigate to '''Settings''': || [[Image:Windows_pycharm_settings.jpg|center|350px|link=https://cdn.phidgets.com/docs/images/7/75/Windows_pycharm_settings.jpg]] |
| | | |- |
| ===IDLE=== | | | Next, navigate to '''Project > Project Interpreter''' and click on the '''+''' symbol: || [[Image:Windows_pycharm_addpackage.jpg|center|350px|link=https://cdn.phidgets.com/docs/images/7/75/Windows_pycharm_settings.jpg]] |
| ====Use Our Examples==== | | |- |
| One of the best ways to start programming with Phidgets is to use our example code as a guide. Before we get started, make sure you have read [[#Install Phidget Python module for Windows| how to install the Phidget Python module]] section above.
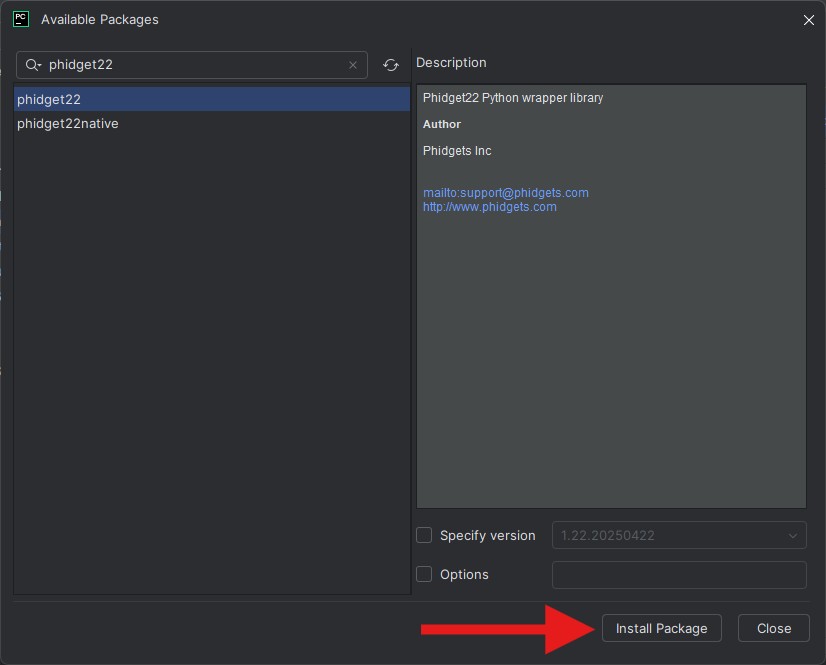
| | | Search for '''phidget22''' and install the package: || [[Image:Windows_pycharm_installpackage.jpg|center|350px|link=https://cdn.phidgets.com/docs/images/a/ad/Windows_pycharm_installpackage.jpg]] |
| | | |- |
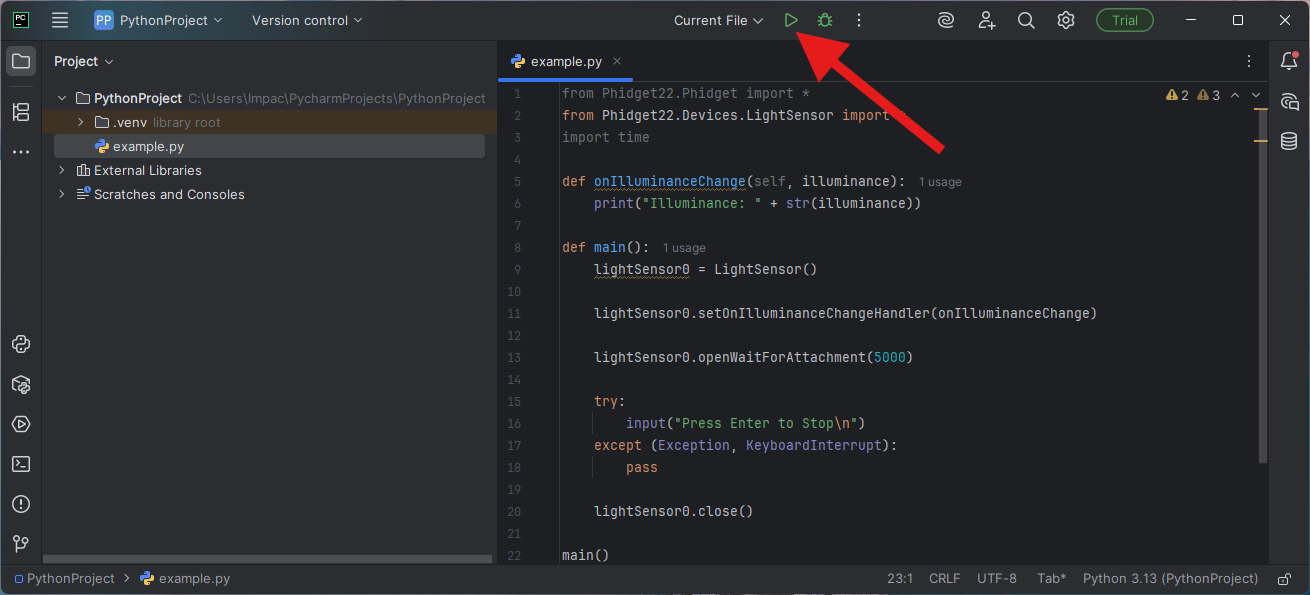
| | | | Finally, add your Python file and run it using the button at the top of the screen: || [[Image:Windows_pycharm_run.png|center|350px|link=https://cdn.phidgets.com/docs/images/0/0a/Windows_pycharm_run.png]] |
| Now that you have Python and the Phidget Python module installed, select an example that will work with your Phidget:
| | |} |
| *{{SampleCode|Python|Python Examples}}
| |
| | |
| | |
| Right-click on the example and open it in IDLE:
| |
| [[Image:Python_idle_open.png|link=|center]]
| |
| | |
| | |
| To run the example, simply click on ''Run'' and select ''Run Module'':
| |
| [[Image:Python_idle_run.png|link=|center]] | |
| | |
| | |
| | |
| You should now have the example up and running for your device. Play around with the device and experiment with some of the functionality. When you are ready, the next step is configuring your project and writing your own code!
| |
| | |
| ====Configure your project====
| |
| When you are building a project from scratch, or adding Phidget functionality to an existing project, you'll need to configure your development environment to properly link the Phidget Java library.
| |
| | |
| | |
| To include the Phidget Python library, add the following line to your code:
| |
| | |
| <syntaxhighlight lang=python>
| |
| from Phidget22.PhidgetException import *
| |
| from Phidget22.Phidget import *
| |
| </syntaxhighlight>
| |
| | |
| Then, you will also have to add a reference to your particular Phidget. For example, you would include the following line for a DigitalInput:
| |
| | |
| <syntaxhighlight lang=python>
| |
| from Phidget22.Devices.DigitalInput import *
| |
| </syntaxhighlight>
| |
| | |
| You can now compile the file as shown in the previous section.
| |
| | |
| | |
| The project now has access to Phidgets. Next, view the [[#Write Code | write your own code]] section located below.
| |
| | |
| ===Visual Studio===
| |
| ====Use Our Examples====
| |
| One of the best ways to start programming with Phidgets is to use our example code as a guide. Before we get started, make sure you have read [[#Install Phidget Python module for Windows| how to install the Phidget Python module]] section above. You will also need to download [https://www.visualstudio.com/ Microsoft Visual Studio] if you have not already.
| |
| | |
| Now that you have Python and the Phidget Python module installed, as well as Visual Studio, select an example that will work with your Phidget:
| |
| *{{SampleCode|Python|Python Examples}}
| |
| | |
| | |
| Next, create a new Python project:
| |
| [[Image:Python_vs_newproject.PNG|link=|center]]
| |
| | |
| | |
| Delete the Python file that was generated with the project:
| |
| [[Image:Python_vs_delete.png|link=|center]]
| |
| | |
| | |
| Add the example you just downloaded by right-clicking on the project and adding an existing item:
| |
| [[Image:Python_vs_addexisting.png|link=|center]]
| |
| | |
| | |
| Select the example as the startup file:
| |
| [[Image:Python_vs_startupproject.png|link=|center]]
| |
| | |
| | |
| Ensure that your Python environment is the same as the version you have installed. Enter the following command to view your Python version if you are unsure:
| |
| <syntaxhighlight lang=python>
| |
| python -V
| |
| </syntaxhighlight>
| |
| | |
| [[Image:Python_version.PNG|link=|center]]
| |
| | |
| | |
| You can view/edit your Python environment under the ''Python Environments'' tab:
| |
| [[Image:Python_vs_environment.png|link=|center]]
| |
| | |
| | |
| You should now have the example up and running for your device. Play around with the device and experiment with some of the functionality. When you are ready, the next step is configuring your project and writing your own code!
| |
| ====Configure your project====
| |
| When you are building a project from scratch, or adding Phidget functionality to an existing project, you'll need to configure your development environment to properly link the Phidget Java library.
| |
| | |
| | |
| To include the Phidget Python library, add the following line to your code:
| |
| | |
| <syntaxhighlight lang=python>
| |
| from Phidget22.PhidgetException import *
| |
| from Phidget22.Phidget import *
| |
| </syntaxhighlight>
| |
| | |
| Then, you will also have to add a reference to your particular Phidget. For example, you would include the following line for a DigitalInput:
| |
| | |
| <syntaxhighlight lang=python>
| |
| from Phidget22.Devices.DigitalInput import *
| |
| </syntaxhighlight>
| |
| | |
| You can now create your project as shown in the previous section.
| |
| | |
| | |
| The project now has access to Phidgets. Next, view the [[#Write Code | write your own code]] section located below.
| |
| | |
| ===LiClipse===
| |
| ====Use Our Examples====
| |
| One of the best ways to start programming with Phidgets is to use our example code as a guide. Before we get started, make sure you have read [[#Install Phidget Python module for Windows | how to install the Phidget Python module]] section above. You will also need to download [http://www.liclipse.com/ LiClipse] if you have not already.
| |
| | |
| Now that you have Python and the Phidget Python module installed, as well as LiClipse, select an example that will work with your Phidget:
| |
| *{{SampleCode|Python|Python Examples}}
| |
| | |
| | |
| Next, create a new Python project:
| |
| [[Image:Python_liclipse_newproject.PNG|link=|center]] | |
| | |
| | |
| Add the example you just downloaded by dragging it into the project:
| |
| [[Image:Python_liclipse_import.png|link=|center]]
| |
| | |
| | |
| Finally, run the project:
| |
| [[Image:Python_liclipse_run.png|link=|center]]
| |
| | |
| | |
| You should now have the example up and running for your device. Play around with the device and experiment with some of the functionality. When you are ready, the next step is configuring your project and writing your own code!
| |
| | |
| ====Configure your project====
| |
| When you are building a project from scratch, or adding Phidget functionality to an existing project, you'll need to configure your development environment to properly link the Phidget Java library.
| |
| | |
| | |
| To include the Phidget Python library, add the following line to your code:
| |
| | |
| <syntaxhighlight lang=python>
| |
| from Phidget22.PhidgetException import *
| |
| from Phidget22.Phidget import *
| |
| </syntaxhighlight>
| |
| | |
| Then, you will also have to add a reference to your particular Phidget. For example, you would include the following line for a DigitalInput:
| |
| | |
| <syntaxhighlight lang=python>
| |
| from Phidget22.Devices.DigitalInput import *
| |
| </syntaxhighlight>
| |
| | |
| You can now create your project as shown in the previous section.
| |
| | |
| | |
| The project now has access to Phidgets. Next, view the [[#Write Code | write your own code]] section located below.
| |
| | |
| ==macOS==
| |
| {{macOS_Languages}}
| |
| ===Install Phidget Python module for macOS===
| |
| Before getting started with the guides below, ensure you have [https://www.python.org/downloads/ Python] installed on your machine (both 2.7 and 3.6 are compatible with Phidgets). You will also need to download the [{{SERVER}}/downloads/phidget22/libraries/any/Phidget22Python/zip Phidget Python module].
| |
| | |
| After unpacking the Phidget Python module, open the terminal at folder location and enter the following command:
| |
| <syntaxhighlight lang=python>
| |
| python setup.py install
| |
| </syntaxhighlight>
| |
| | |
| This will build the module and install the Python module files into your site-packages directory.
| |
| | |
| [[File:Python_mac_install.png|link=|center]]
| |
| | |
| ===Terminal===
| |
| ====Use Our Examples====
| |
| One of the best ways to start programming with Phidgets is to use our example code as a guide. Before we get started, make sure you have read [[#Install Phidget Python module for macOS| how to install the Phidget Python module]] section above.
| |
| | |
| | |
| Now that you have Python and the Phidget Python module installed, select an example that will work with your Phidget:
| |
| *{{SampleCode|Python|Python Examples}}
| |
| | |
| | |
| Open the terminal at the location of the example and enter the following command:
| |
| <syntaxhighlight lang=bash>
| |
| python example.py
| |
| </syntaxhighlight>
| |
| | |
| | |
| [[Image:Python_mac_terminal_run.png|link=|center]] | |
| | |
| | |
| You should now have the example up and running for your device. Play around with the device and experiment with some of the functionality. When you are ready, the next step is configuring your project and writing your own code!
| |
| | |
| When you are building a project from scratch, or adding Phidget functionality to an existing project, you'll need to configure your development environment to properly link the Phidget Java library.
| |
| | |
| | |
| To include the Phidget Python library, add the following line to your code:
| |
| | |
| <syntaxhighlight lang=python>
| |
| from Phidget22.PhidgetException import *
| |
| from Phidget22.Phidget import *
| |
| </syntaxhighlight>
| |
| | |
| Then, you will also have to add a reference to your particular Phidget. For example, you would include the following line for a DigitalInput:
| |
| | |
| <syntaxhighlight lang=python>
| |
| from Phidget22.Devices.DigitalInput import *
| |
| </syntaxhighlight>
| |
| | |
| You can now compile the file as shown in the previous section.
| |
| | |
| | |
| The project now has access to Phidgets. Next, view the [[#Write Code | write your own code]] section located below.
| |
| | |
| == Linux ==
| |
| {{Linux_Languages}}
| |
| ===Install Phidget Python module for Linux===
| |
| Before getting started with the guides below, ensure you have [https://www.python.org/downloads/ Python] installed on your machine (both 2.7 and 3.6 are compatible with Phidgets).
| |
| | |
| You will also need to download the [{{SERVER}}/downloads/phidget22/libraries/any/Phidget22Python/zip Phidget Python module].
| |
| | |
| After unpacking the Phidget Python module, open the terminal at folder location and enter the following command:
| |
| <syntaxhighlight lang=python>
| |
| python setup.py install
| |
| </syntaxhighlight>
| |
| | |
| This will build the module and install the Python module files into your site-packages directory.
| |
| | |
| [[File:Python_linux_install.PNG|link=|center]]
| |
| | |
| ===Terminal===
| |
| ====Use Our Examples====
| |
| One of the best ways to start programming with Phidgets is to use our example code as a guide. Before we get started, make sure you have read [[#Install Phidget Python module for Linux| how to install the Phidget Python module]] section above.
| |
| | |
| | |
| Now that you have Python and the Phidget Python module installed, select an example that will work with your Phidget:
| |
| *{{SampleCode|Python|Python Examples}}
| |
| | |
| | |
| Open the terminal at the location of the example and enter the following command:
| |
| <syntaxhighlight lang=bash>
| |
| python example.py
| |
| </syntaxhighlight>
| |
| | |
| | |
| [[Image:Python_linux_terminal_run.png|link=|center]] | |
| | |
| | |
| You should now have the example up and running for your device. Play around with the device and experiment with some of the functionality. When you are ready, the next step is configuring your project and writing your own code!
| |
| ====Configure your project====
| |
| When you are building a project from scratch, or adding Phidget functionality to an existing project, you'll need to configure your development environment to properly link the Phidget Java library.
| |
| | |
| | |
| To include the Phidget Python library, add the following line to your code:
| |
| | |
| <syntaxhighlight lang=python>
| |
| from Phidget22.PhidgetException import *
| |
| from Phidget22.Phidget import *
| |
| </syntaxhighlight>
| |
| | |
| Then, you will also have to add a reference to your particular Phidget. For example, you would include the following line for a DigitalInput:
| |
| | |
| <syntaxhighlight lang=python>
| |
| from Phidget22.Devices.DigitalInput import *
| |
| </syntaxhighlight>
| |
| | |
| You can now create your project as shown in the previous section.
| |
| | |
| | |
| The project now has access to Phidgets. Next, view the [[#Write Code | write your own code]] section located below.
| |
| | |
| ==Write Code==
| |
| By following the instructions for your operating system and compiler above, you probably now have a working example and want to understand it better so you can change it to do what you want. This [[#Edit the Examples|teaching section]] has resources for you to learn from the examples and write your own.
| |
| Your main reference for writing Python code will be the {{Phidget22API}}.
| |
| | |
| === Code Snippets === | |
| | |
| The following code snippets describe how to do various general tasks with Phidgets. You should be able to find places in the examples where these snippets exist, and modify them to suit your requirements.
| |
| | |
| ==== Step One: Initialize and Open ====
| |
| | |
| Before using a Phidget, it must first be created and opened.
| |
| | |
| <syntaxhighlight lang=python>
| |
| # Create
| |
| try:
| |
| device = DigitalInput()
| |
| except RuntimeError as e:
| |
| print("Runtime Error: %s" % e.message)
| |
|
| |
| # Open
| |
| try:
| |
| device.open()
| |
| except PhidgetException as e:
| |
| print (“Phidget Exception %i: %s” % (e.code, e.details))
| |
| exit(1)
| |
| </syntaxhighlight>
| |
| | |
| The variable device is now a handle for the Phidget. This example is ''specific to the Digital Input'' because the call DigitalInput() is used. For another device, use the correspondingly named call in the Python API.
| |
| | |
| The handle '''device''' is then used for all the Python function calls using the Phidget for its device-specific functions - in this case, Digital Input specific functions. Every type of Phidget also inherits functionality from the Phidget base class.
| |
| | |
| Note that open() opens the software object, but not hardware. So, it is not a guarantee you can use the Phidget immediately.
| |
| | |
| Also note that you can catch exceptions thrown by the Phidget library as we did above when using the open() call. In other words, this should probably be present around most of your Phidget calls, especially when you are learning how to use the Phidget and debugging your code:
| |
| | |
| <syntaxhighlight lang=python>
| |
| try:
| |
| # Your code goes here
| |
| except PhidgetException as e:
| |
| print (“Phidget Exception %i: %s” % (e.code, e.details))
| |
| exit(1)
| |
| </syntaxhighlight>
| |
| | |
| ==== Step Two: Wait for Attachment (plugging in) of the Phidget ====
| |
| | |
| To use the Phidget, it must be plugged in (attached). We can handle this simply by calling openWaitForAttachment in place of the basic open. This function works for any Phidget. openWaitForAttachment will block until a connection is made to the Phidget, or the specified timeout is exceeded:
| |
| | |
| <syntaxhighlight lang=python>
| |
| device.openWaitForAttachment(5000)
| |
| print ("%d attached!" % (device.getDeviceSerialNumber()))
| |
| </syntaxhighlight>
| |
| | |
| Sometimes, it makes more sense to handle the attachment via an event. This would be in instances where the Phidget is being plugged and unplugged, and you want to handle these incidents. Or, when you want to use event-driven programming because you have a GUI-driven program. In these cases, an event-driven code snippet to handle the attachment might look something like this:
| |
| | |
| <syntaxhighlight lang=python>
| |
| def AttachHandler(e):
| |
| attachedDevice = e
| |
| serialNumber = attachedDevice.getSerialNum()
| |
| deviceName = attachedDevice.getDeviceName()
| |
| print("Hello to Device " + str(deviceName) + ", Serial Number: " + str(serialNumber))
| |
|
| |
| # Insert code for -creating- device here....
| |
|
| |
| try:
| |
| device.setOnAttachHandler(AttachHandler)
| |
| except PhidgetException as e:
| |
| # Insert code for handling any exceptions
| |
| # A common exception will occur if you do not create the device properly above
| |
|
| |
| # Insert code for -opening- device here....
| |
| </syntaxhighlight>
| |
| | |
| ==== Step Three: Do Things with the Phidget ====
| |
| | |
| You can read data and interact with your Phidget both by polling it for its current state (or to set a state), or by catching events that trigger when the data changes.
| |
| | |
| For a Phidget Digital Input or Output, the polling method of getting the input state or setting an output state looks something like this:
| |
| | |
| <syntaxhighlight lang=python>
| |
| #Get the state from a digital input
| |
| digitalInputDevice.getState()
| |
| | |
| #Set the duty cycle for a digital output
| |
| digitalOutputDevice.setDutyCycle(0)
| |
| </syntaxhighlight>
| |
| | |
| To catch data changes via events, you would use something like this:
| |
| | |
| <syntaxhighlight lang=python>
| |
| def StateChangeHandler(e, state):
| |
| print("State %f" % state)
| |
| return 0
| |
| | |
| # Insert code to create an Digital Input called 'device'
| |
|
| |
| # Hook our function above into the device object
| |
| device.setOnStateChangeHandler(StateChangeHandler)
| |
|
| |
| # Insert code to open 'device'
| |
| </syntaxhighlight>
| |
| | |
| ==== Step Four: Close and Delete ====
| |
| | |
| At the end of your program, don’t forget to call close() to free any locks on the Phidget that the open() call put in place!
| |
| | |
| <syntaxhighlight lang=python>
| |
| device.close()
| |
| </syntaxhighlight>
| |
| | |
| == Further Reading ==
| |
| | |
| [[Phidget Programming Basics]] - Here you can find the basic concepts to help you get started with making your own programs that use Phidgets.
| |
| | |
| [[Data Interval/Change Trigger]] - Learn about these two properties that control how much data comes in from your sensors.
| |
| | |
| [[Using Multiple Phidgets]] - It can be difficult to figure out how to use more than one Phidget in your program. This page will guide you through the steps.
| |
|
| |
|
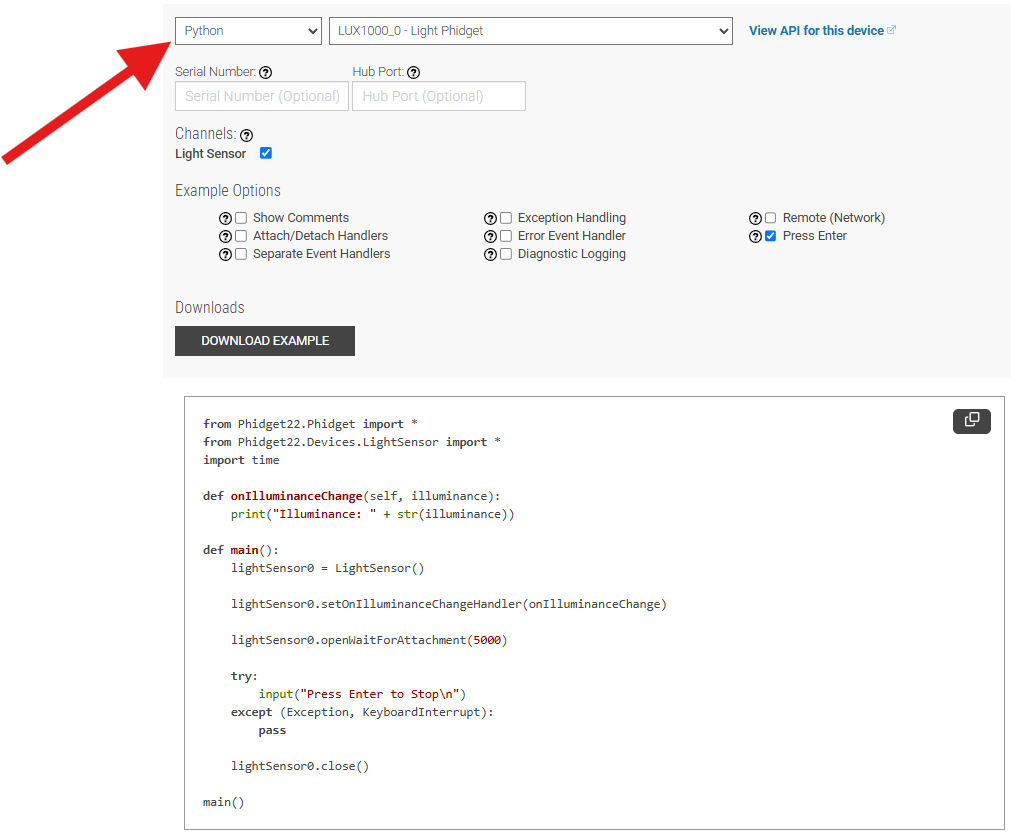
| [[Polling vs. Events]] - Your program can gather data in either a polling-driven or event-driven manner. Learn the difference to determine which is best for your application. | | ==Example Code== |
| | Navigate to our [https://www.phidgets.com/?view=code_samples Code Sample Generator] and select Python to view and download code samples that are tailored to your specific device. |
|
| |
|
| [[Logging, Exceptions, and Errors]] - Learn about all the tools you can use to debug your program. | | [[Image:Language_python_codesample.png|center|600px|link=https://cdn.phidgets.com/docs/images/2/2d/Language_python_codesample.png]] |
|
| |
|
| [[Phidget Network Server]] - Phidgets can be controlled and communicated with over your network- either wirelessly or over ethernet. | | ==API== |
| | [{{SERVER}}/?view=api&lang=Python Phidget22 API] |